Introduction
Use IBackup’s scripts bundle to backup and keep your Linux data safe. With an IBackup online account you can protect files during transfer and storage, using 256-bit AES encryption with an optional private key.
System/Software Requirements
Linux(CentOS/Ubuntu/Fedora/openSUSE/FreeBSD/Linux Mint) - 32-bit/64-bit
Perl v5.8 or later
Script Download
Downloaded script bundle needs to be extracted into a particular folder on your Linux server.
After extraction of the zip archive, you will find the scripts folder in it. Following files will be present in the scripts folder:
- account_setting.pl
- archive_cleanup.pl
- Backup_Script.pl
- check_for_update.pl
- edit_supported_files.pl
- express_backup.pl
- job_termination.pl
- login.pl
- logout.pl
- view_log.pl
- Restore_Script.pl
- restore_version.pl
- scheduler.pl
- send_error_report.pl
- speed_analysis.pl
- Status_Retrieval_Script.pl
- Uninstall_Script.pl
Other supported files
- Constants.pm
- cron.pl
- Header.pl
- Operations.pl
- readme.txt
- utility.pl
- Helpers.pm
Other supported folders
- Idrivelib - Contains cron startup routine files for all supported platforms and required perl modules.
Other supported files/folders are used internally by executable script files and users must not try to execute these scripts for any reason.
Provide an appropriate permission (executable permission) to the scripts.
Example: chmod a+x *.pl
Set up your IBackup accountYou need to have an IBackup account to use the script package to backup your files. In case you do not have one,
please create now.
To set up the script package locally with your IBackup account, run the below command and follow the instructions.
$./account_setting.pl
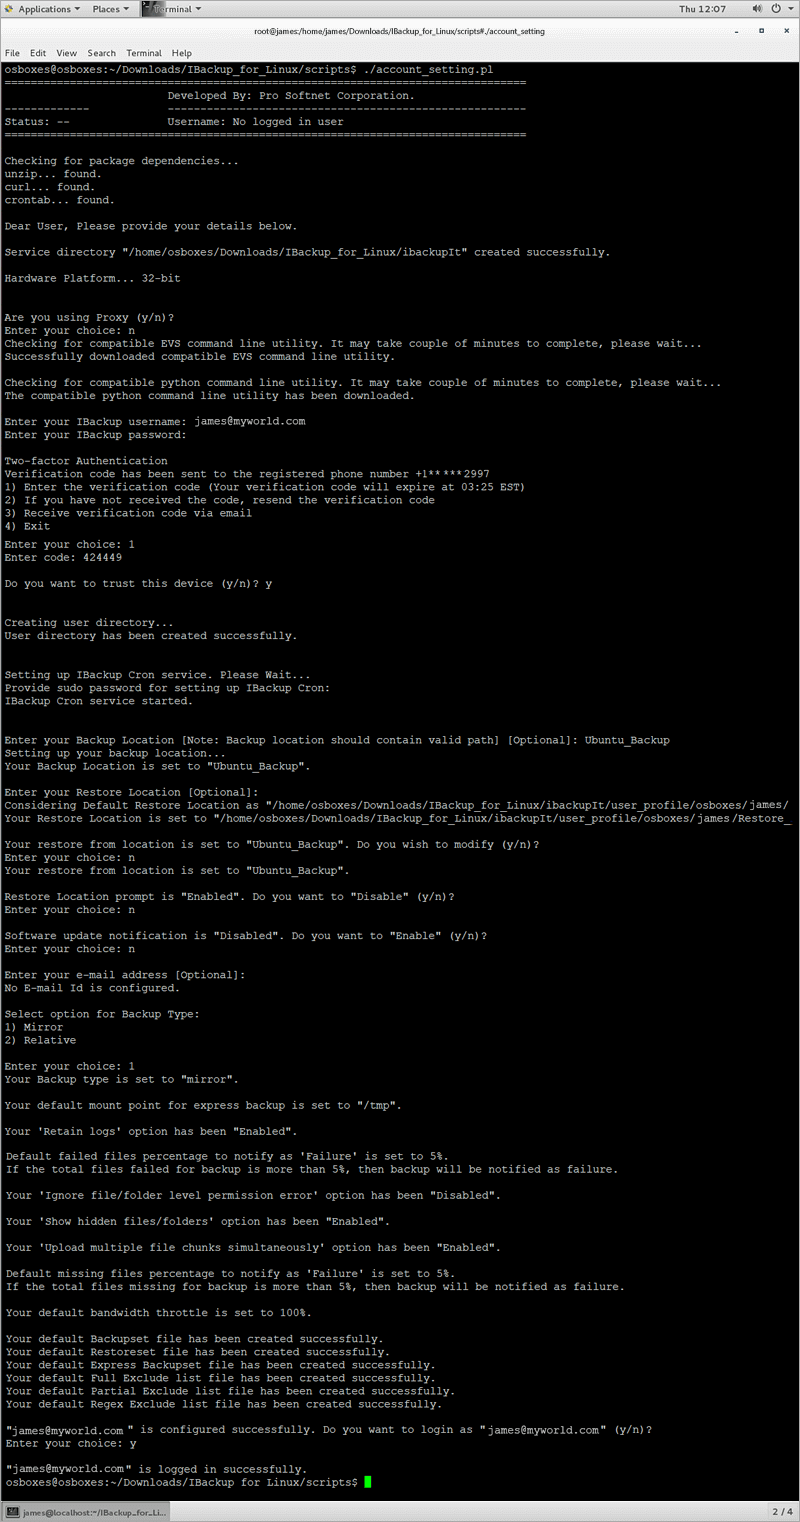
Two-Factor Authentication
The two-factor authentication provides additional security to your account and helps in preventing unauthorized access. Once two-factor authentication is enabled via web, in addition to your password, you will need to enter a verification code sent to your email address or phone number or generated via Time-based OTP authenticator app, while signing in to your IBackup account.
To sign in after two-factor authentication is enabled,
- Run account_setting.pl, enter your IBackup username and password.
- If you have selected Email address or Phone number as the preferred method of receiving one-time verification code, enter the same and press "Enter" key.
Note: You can also add your computer as a trusted device by entering (y) when Trust this computer option is prompted. Once a computer is added as a trusted device, users will not be asked to enter verification code during any subsequent login or account reconfiguration. - If you have selected Time-based OTP authentication as the preferred method of receiving one-time verification code, enter the one-time code generated by the Time-based OTP authenticator app in your mobile device.
Note: While setting up the script bundle for the first time, users will be asked to enter the service path, which will contain user specific data required to perform operations via script bundle.
Working with the Scripts
Using IBackup scripts, you can:
- Perform backup / express backup / restore operations
- View progress of backup / express backup /restores /archive cleanup jobs
- Schedule backup / express backup / archive cleanup job
- View log files and more
Login to your IBackup account
If you are not logged in to your IBackup account while setting up your bundle package, run the below command:
$./login.pl
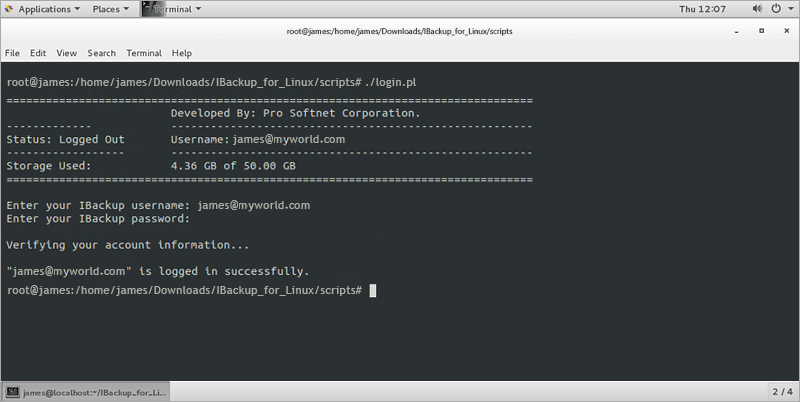
Note: Login script is a mandatory script to be executed before performing any backup/express backup/restore operation. This script will authenticate your IBackup account details and will create a secure session for your backups.
Edit your backup set/express backup set/restore set, and exclude files
The user must provide the file or folder list required to backup/express backup/restore in the backup/express backup/restore set file respectively, before starting the operation. To update these details in the backup/express backup/restore set file you must execute the below command:
$./edit_supported_files.pl
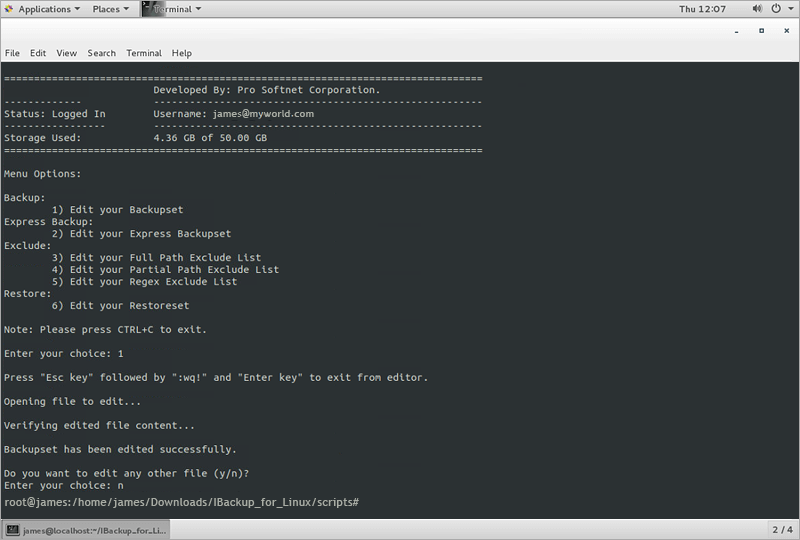
The menu option will be displayed. Select option 1 to edit the backup set file for your backup. Respective file will open in the vi editor to edit. Add the files/folders that need to be backed up.
Using the same script you can update the express backup set, restore set and exclude files by selecting the desired option.
Exclude Files/Folders from your backup set
By using the Exclude option for edit-supported file scripts, you can exclude files / folders from being backed up to your IBackup account.
There are three options to choose from:
- Full Path Exclude
- Partial Path Exclude
- Regex Exclude
Full Path Exclude
To exclude files / folders with full path,
- Run 'edit_supported_files.pl' script and select the option 'Edit Your Full Path Exclude List'. The 'FullExcludeList.txt' file will open in a text editor.
- Add the full path of the files / folders that you wish to exclude.
- Enter each item in a new line.
- Save and exit.
Example:
Your backupset contains /home/Documents and if you want to exclude /home/Documents/temp, enter the folder path ie: '/home/Documents/temp' in the FullExcludeList file.
Partial Path Exclude
To exclude files / folders with partial path,
- Run 'edit_supported_files.pl' script and select the option 'Edit Your Partial Path Exclude List'. The 'PartialExcludeList.txt' file will open in a text editor.
- Add the partial name of the files / folders that you wish to exclude.
- Enter each item in a new line.
- Save and exit.
Example:
Your backupset contains /home/Documents and if you want to exclude all the pst files from this folder like /home/Documents/designtutorials.pst, /home/Documents/new.pst, /home/Documents/James/tutorials.pst etc, then enter 'pst' in the PartialExcludeList file.
Regex Exclude
To exclude files / folders based on regex pattern,
- Run 'edit_supported_files.pl' script and select the option 'Edit Your Regex Exclude List'. The 'RegexExcludeList.txt' file will open in a text editor.
- Add the regex pattern of the files / folders that you wish to exclude.
- Enter each item in a new line.
- Save and exit.
Example:
Your backupset contains /home/Folder01 , /home/Folder02, /home/FolderA, /home/FolderB. If you want to exclude all folders/files that contain numeric values in the name, i.e. /home/Folder01, /home/Folder02, then enter 'Folder\d+' in the RegexExcludeList file.
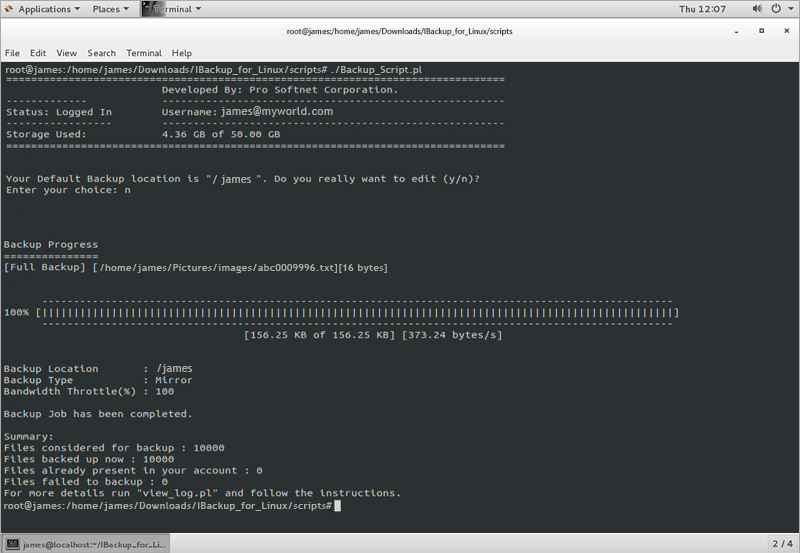
Immediate/Manual backup
You can perform immediate/manual backup using the below command:
$./Backup_Script.pl
When you run the backup script, it will reconfirm your backup location and allow you to change it. You can now view the graphical progress bar for your backup operations. Use the “--silent” flag with the command, if you do not want the script to ask for the backup location or display progress bar.
Immediate/Manual express backup
You can perform immediate/manual express backup using the below command:
$./express_backup.pl
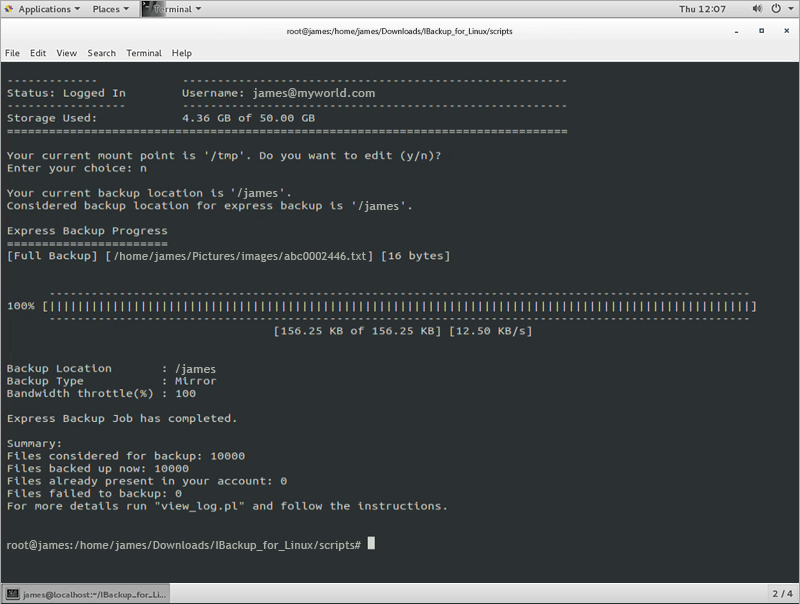
Using this script, users can backup their Linux machine data to the express device shipped to them. Once data is backed up, users can ship this express device back to us and within a week their data will be available in their IBackup account. For more details on express, visit IBackup Express™ for Linux.
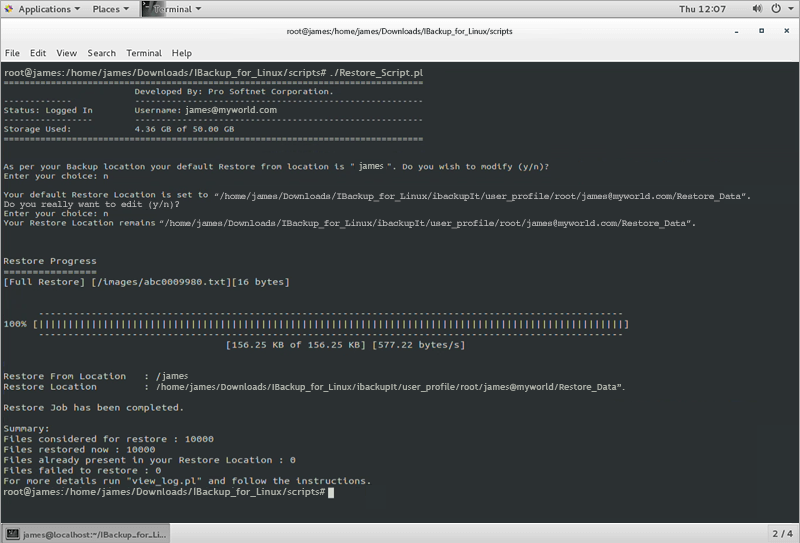
Immediate/Manual restore
You can perform immediate/manual restore using the below command:
$./Restore_Script.pl
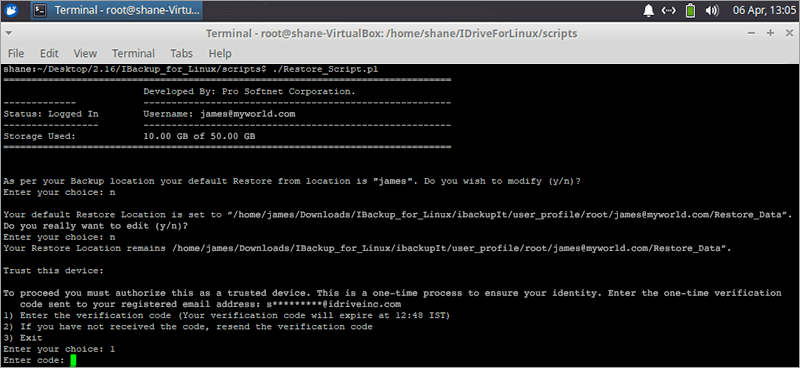
Device Verification for Restore
This is a one-time process to ensure your identity. You will need to enter the one-time verification code sent to your registered email address to authorize this as a trusted device and continue.- While running the IDrive Restore script in the terminal, after entering "Restore Location", "Trust this device" screen will appear.
- You will be prompted to enter a one-time verification code sent to your registered email address via option1. The code can be used only once and will expire after 5 minutes.
Note: In case the code expires or you have not received the email, you can Resend it via option2 to send an email with a new verification code. - Enter the code.
- Once a device is added as a trusted device, users will not be asked to enter one-time verification code during any subsequent restore operations.
Note:
- Users should be able to get this one-time verification code via registered email address only.
- In case you are unable to receive email with one-time verification code, contact support.
- This one-time device verification is only applicable for Restore_Script.pl and restore_version.pl script.
When you run the restore script, it will reconfirm the ‘restore’ and ‘restore from’ locations and will allow you to change it, if required. You can now view the graphical progress bar for your restore operations. Use “--silent” flag with the command, if you do not want the script to ask for restore location, restore from location, or display progress bar.
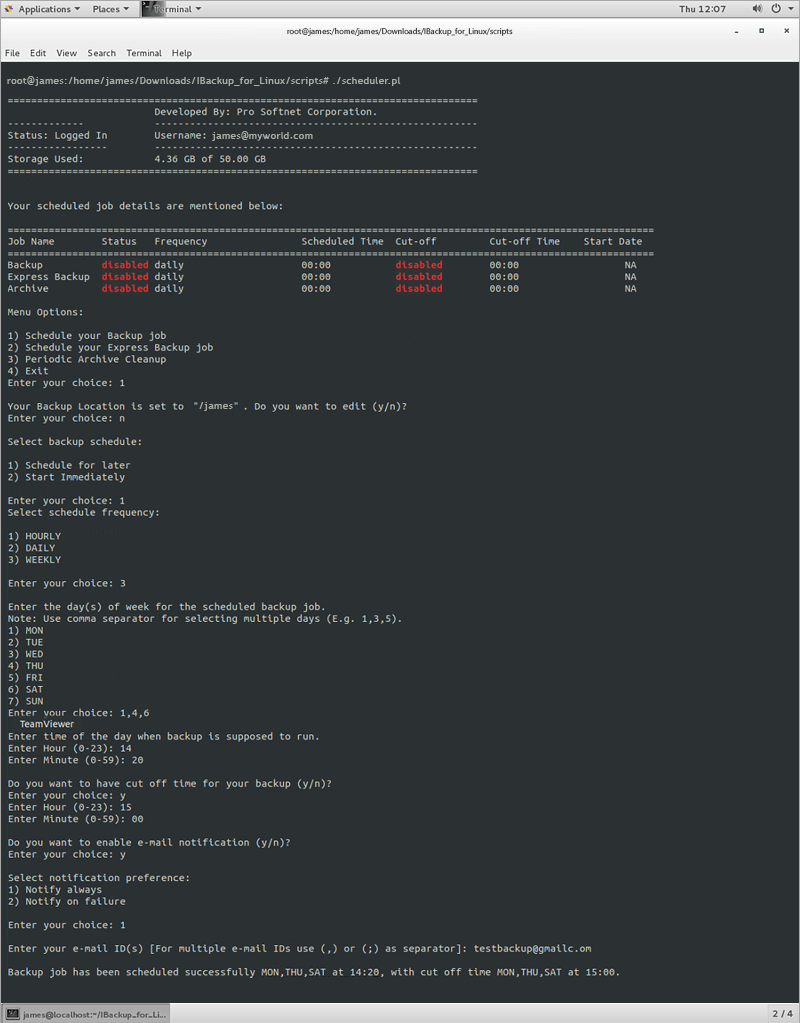
Schedule backup/express backup/archive cleanup job
Run the below command to manage your schedule backup/express backup/archive cleanup job:
$./scheduler.pl
Select the desired menu option to create, edit, view or delete your schedule backup / express backup / archive cleanup job and follow the instructions.
In case you want your scheduled job to stop automatically at a scheduled time, then set the cut-off time as well, while following the instructions.
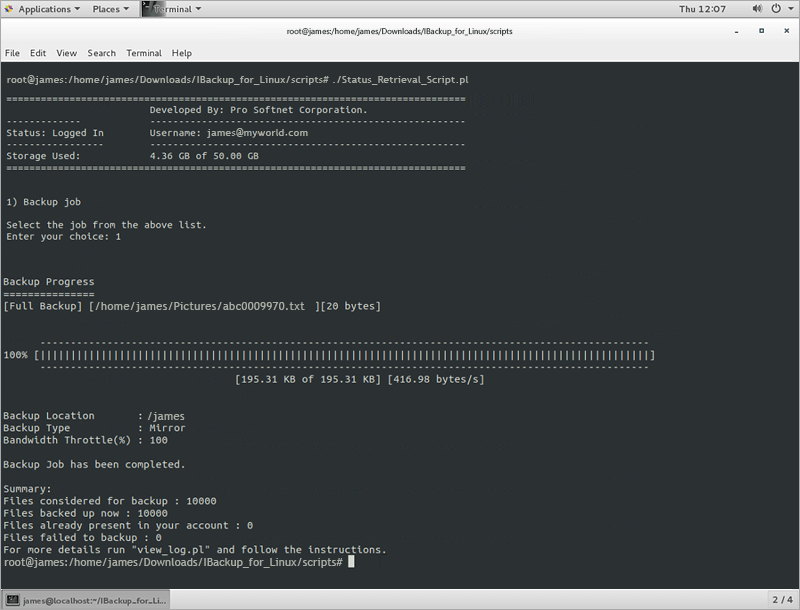
View progress of scheduled backup/restore job
To view the progress of scheduled backup or restore operation, run the below command:
$./Status_Retrieval_Script.pl
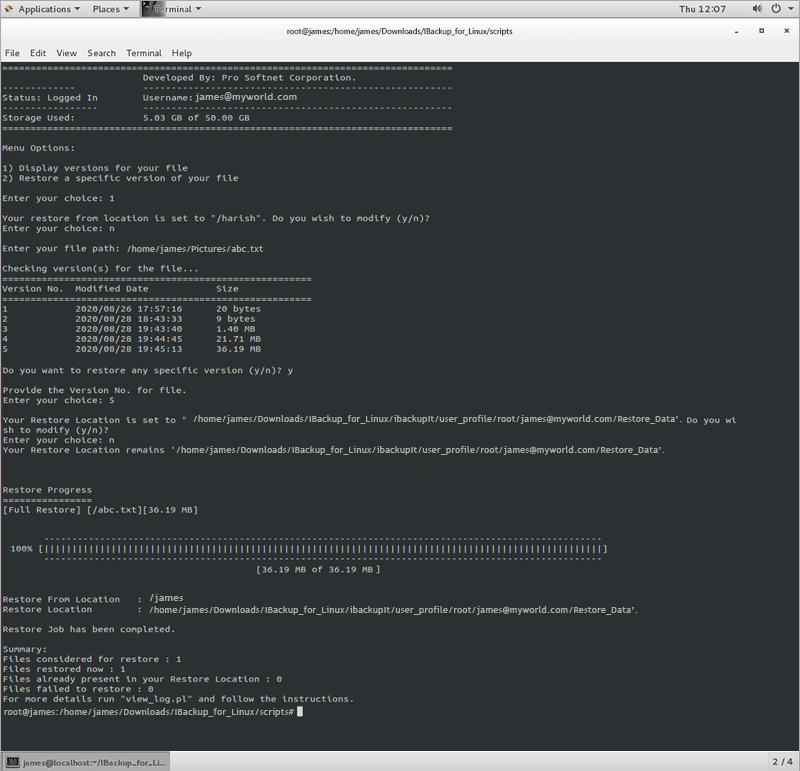
View/restore previous versions of a file
You can view the list of previous versions of any file and select any version that you want to restore. To retrieve a file with earlier versions, run the below command:
$./restore_version.pl
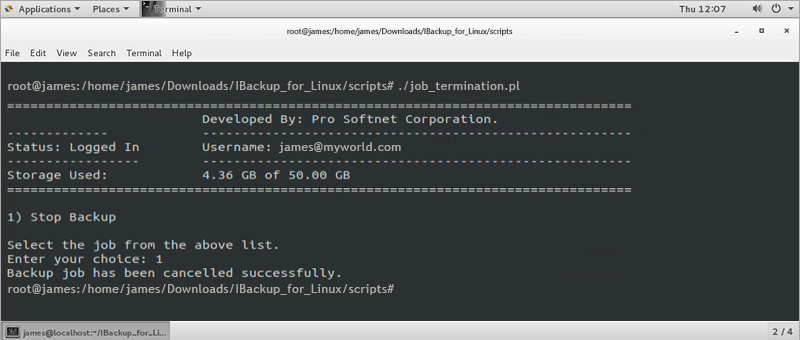
Stop ongoing backup/express backup/restore operations
To stop an ongoing backup or express backup or restore operation, run the below command:
$./job_termination.pl
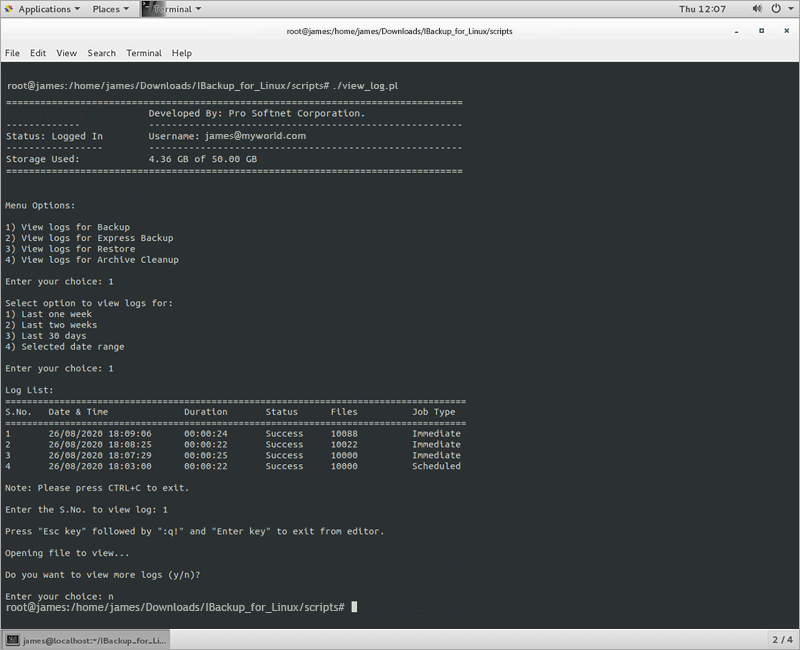
View/Delete operation logs
You can view the backup or express backup or restore log files by running the below command:
$./view_log.pl
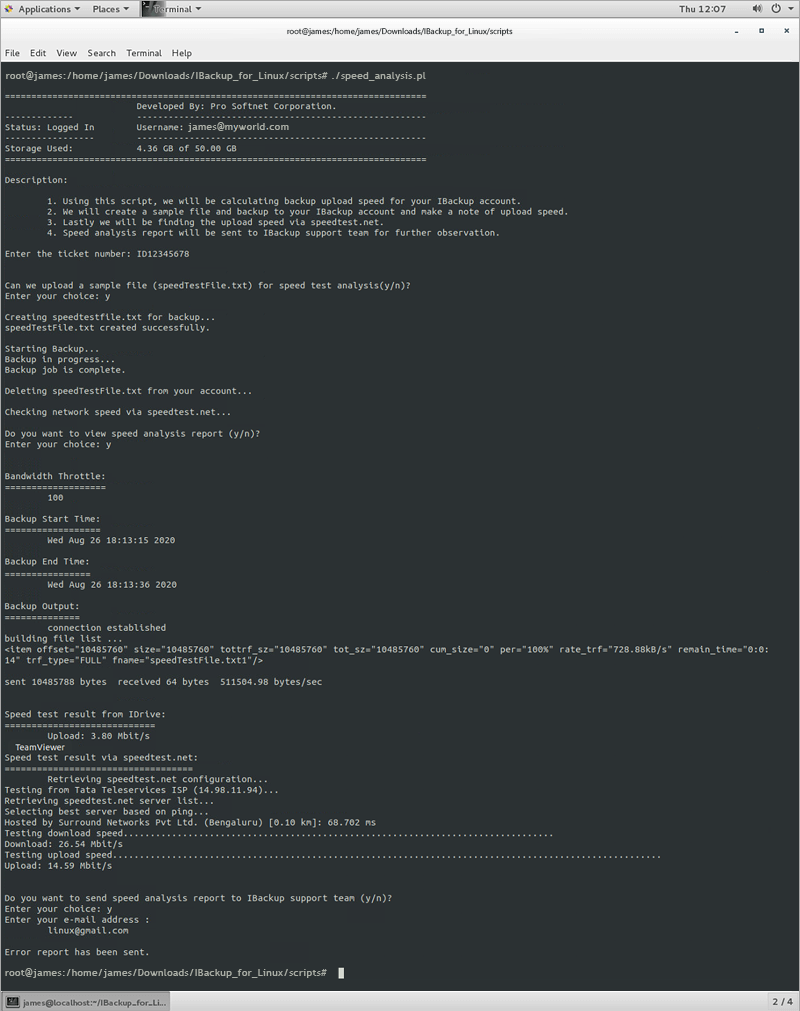
Speed analysis
You can check the upload speed of your backup using the below command.
$./speed_analysis.pl
When you run this script, it will create a sample file and backup to your IBackup account, while making a note of the upload speed. The upload speed will be calculated via speedtest.net and the speed analysis report will be sent to the IBackup support team for further observation.
Logout from your IBackup account
To end the logged in session for your IBackup account, run the below command:
$./logout.pl
Users must logout (optional) from the account to avoid any unauthorized access to their IBackup account. After logout, the user needs to login again to perform most of the operations.
Note: Your scheduled backup / scheduled express backup / periodic cleanup jobs will run even after you log out.
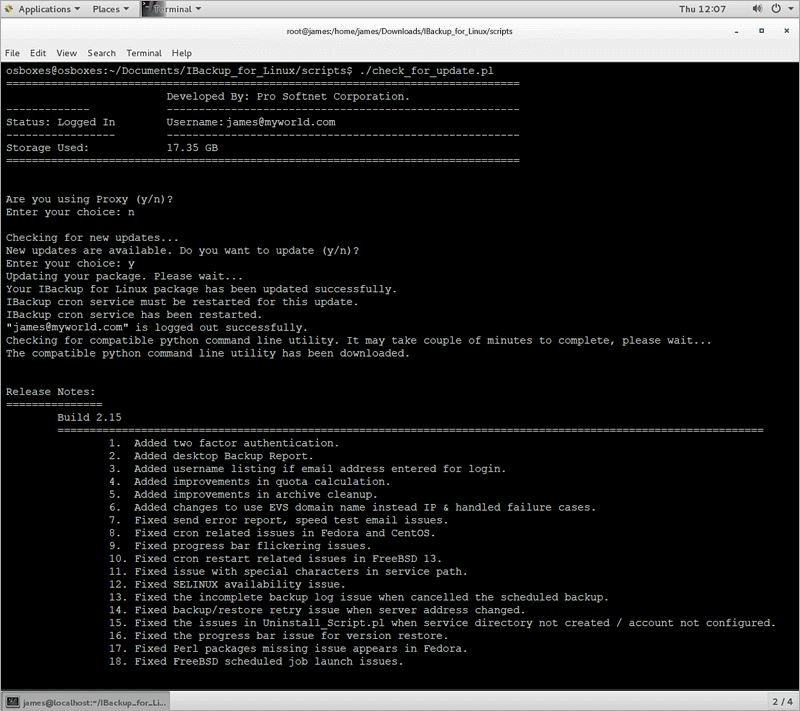
Updating your script bundle
Every script that gets executed, displays a header which provides details of the logged in IBackup account. Same header also displays information on any newly available script bundle.
If you see a message A new update is available. Run check_for_update.pl to update to the latest package indicates that a new improved version of script bundle is available.
To update to most recent available script bundle please perform the below command and follow the instructions:
$./check_for_update.pl
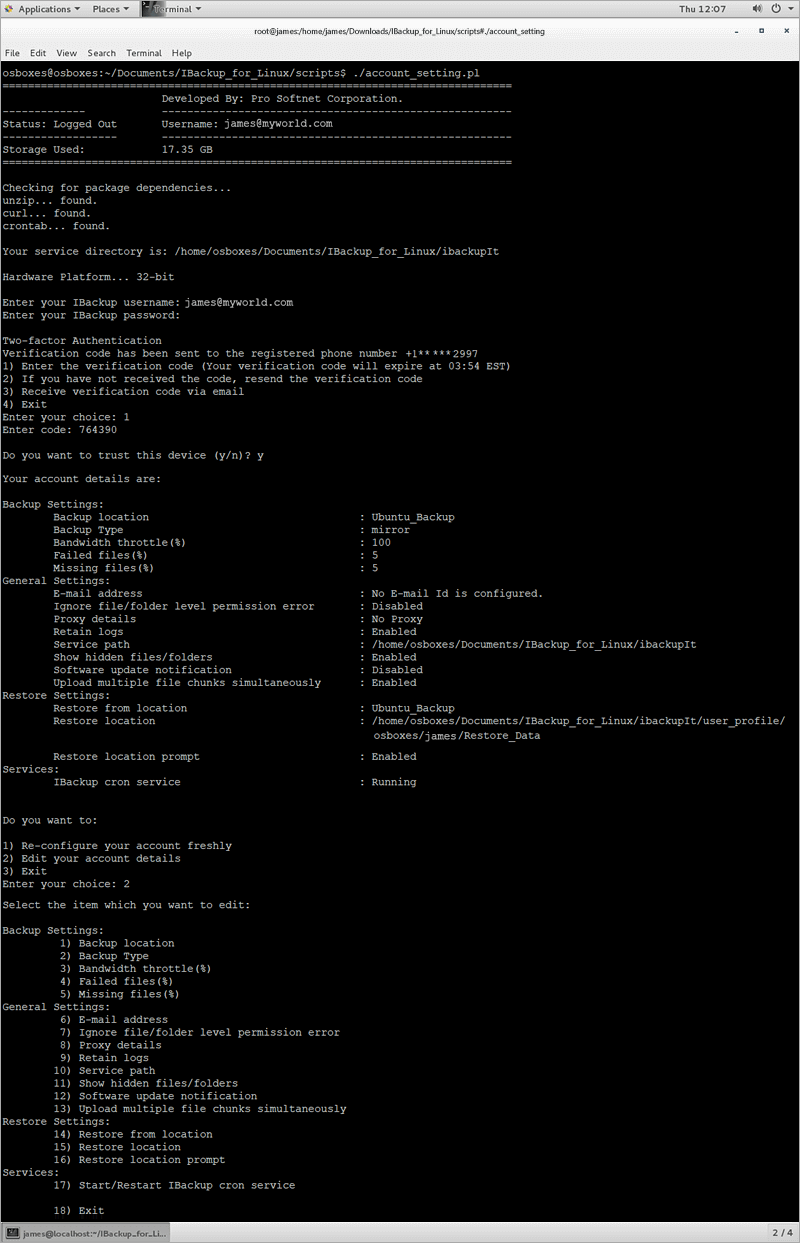
Edit user details
In case you want to reconfigure your IBackup account locally due to any reason or want to edit user details locally for your configured IBackup account then please perform the below command.
$./account_setting.pl
Only if your account is already configured in the current machine you will find the menu which will allow you to reconfigure your IBackup account locally or will allow you to edit the user details locally for your IBackup account. Select the desired option and follow the instructions.
Backup Settings:
- Backup location: Update the backup location using this option.
- Backup type: Change the backup type from mirror to relative and vice versa using this option.
- Bandwidth throttle(%): Set the Internet bandwidth to be used by the scripts for backups using this option.
- Failed files(%): By default failed files % to notify backup as 'Failure' is set to 5%. If the total files failed for backup is more than 5%, then backup will be notified as failure. Change the default setting using this option.
- Missing files(%): By default missing files % to notify backup as 'Failure' is set to 5%. If the total files missing for backup is more than 5%, then backup will be notified as failure. Change the default setting using this option.
General Settings:
- Retain logs: Disable this setting to stop saving the log files.
- E-mail address: Use this option to change the email address provided at the time of account setup locally.
- Ignore file/folder level permission error: If your backup set contains files/folders that have insufficient access rights, IBackup will not backup those files/folders. Hence in such a case, by default, your backup will be considered as 'Failure'. To ignore file/folder level access rights/permission errors, enable this setting.
- Proxy details: If you are behind a proxy address, you should update the proxy settings using this option.
- Show hidden files/folders: Disable this setting to skip hidden files/folders from backup.
- Software update notification: Enable this setting to get a notification for available updates in script header.
- Upload multiple file chunks simultaneously: Enable this option to upload multiple file chunks simultaneously to improve overall data transfer speed.
- Service path: Update the service path used by IBackup scripts using this option.
Restore Settings:
- Restore from location: Use this option to change the location from where the backups will be restored.
- Restore location: Use this option to change the restore location.
- Restore location prompt: Enable this setting if you wish to receive notification about the restore location before starting restore.
Services:
- Start/Restart IBackup cron service: Use this option to start or restart IBackup cron service. This service is responsible for all the scheduled jobs to work as expected.
Select the desired option and follow the instructions.
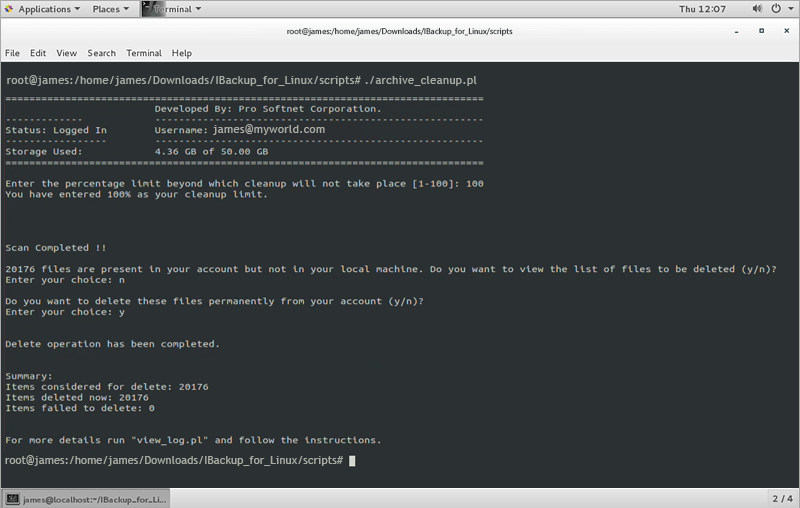
Archive cleanup
Archive Cleanup compares the files of your local storage selected for backup, with the files in your IDrive online backup account. It then deletes the files present in your account but not on your local machine. This feature thus helps you to free up space in your online backup account.
To perform archive cleanup, run the below command:
$./archive_cleanup.pl
When you run the script to perform archive cleanup, you can enter a percentage of the total number of files to be considered for deletion. This percentage-based control helps to avoid large scale deletion of files in your account.
Uninstalling your script bundle
Uninstalling the script package from your system will leave the files/folders of your system liable to digital disasters.
To uninstall the script bundle run the below command and follow the instructions.
$./Uninstall_Script.pl
This script will automatically remove all package script files and other dependency files. It will also stop all IBackup specific services and cleanup the scheduled backup / express backup / restore / periodic cleanup jobs, if any.
Others
Script bundle have some more script files (Header.pl, Helpers.pm, Constants.pm, cron.pl, Utility.pl and Operations.pl) which are used internally by other scripts and user must not try to execute these scripts for any reason.