Windows
General
- What is IBackup?
- Does IBackup use Delta Blocking technology?
- Does IBackup support my native character set?
- How to install IBackup silently from command line?
Quota
- If I keep on performing backups, will I use up my quota quickly?
- I received a quota overuse email. What should I do?
- I have deleted some unwanted files/folders from my IBackup account. However, the display of the total storage space used does not change. How do I know the exact quota used?
Backup
- How do I take an immediate backup of my files?
- How can I take an immediate backup without signing into the application?
- What is incremental backup?
- How do I schedule my backup?
- How do I create multiple backup sets?
- How do I schedule different backup sets?
- Does IBackup perform scheduled backups in Standby mode?
- How do I view the status of my scheduled backups?
- Can I use IBackup to schedule full and incremental backups on specific days?
- Can I view the report of all my schedule backups?
- Is it possible to view all the scheduled backup/restore jobs of all my IBackup accounts on my computer?
- I had enabled the Relative Path for backup, but now I am unable to change it. How do I change the settings?
- How do I backup data from multiple computers to a single IBackup account?
- If I am backing up data from multiple computers, do I need to change the backup location?
- How do I change the default backup location?
- How can I exclude certain files/folders from being backed up?
- How will I be notified of the status of my backup jobs?
- Is there a way to receive an alert in case my backup fails?
- Is there a way to delete the scheduled backup/restore jobs?
- How do I view the log reports?
- Can I halt my scheduled backups at a particular time?
- Does IBackup support backup and restore of files larger than 2 GB?
- What does IBackup do if the Internet connection is interrupted during a backup session?
- When will IBackup resume the session if it has been missed (example, The computer has been abruptly turned off) or interrupted?
- How do I locate files in my account using IBackup?
- How do I regulate my Internet bandwidth for IBackup?
- Can I change my IBackup password while in the middle of a scheduled backup?
- Can IBackup work with virtual machines?
Mapped drive and open file backup
- Does IBackup support backup of mapped drives?
- Can I backup open files with IBackup?
- If all my file system partitions are on FAT32, can I backup my open files?
- Can I backup the MS Exchange Server and MS SQL Server related files using the open file backup feature?
- Can I backup open files, which are in the mapped/network drive(s), using the Open file Backup feature?
- Can I backup Mapped / USB / External drives?
Continuous Data Protection
- What is Continuous Data Protection (CDP)?
- Can I set the frequency of backups under Continuous Data Protection feature?
- What are the advantages of Continuous Data Protection?
- Will the scheduled backups occur even when the Continuous Data Protection feature is enabled?
Versioning
- How many prior versions of a file are stored in my account?
- How do I restore any particular version of a file?
- Does IBackup support folder-wise restore of files with earlier versions?
Share
Restore
- How do I restore files or folders from my IBackup account?
- Is it possible to restore the files/folders that are accidentally deleted from my IBackup account?
- Can I restore the previous version of a file from Trash?
- Can I schedule the restore of my backed up data to my local machine?
Archive Cleanup
Security
- Is my data secure with IBackup?
- What is two-factor authentication?
- How do I sign in to my IBackup account once two-factor authentication is enabled?
Common user queries
- On reboot, IBackup does not connect. Why?
- I am not receiving email notification for the scheduled backup jobs. Why?
- Some of the files or folders selected for backup are not getting backed up. How can I make the application consider these files or folders for backup?
- My backups are not taking place for a few days. Why?
- I wish to remove a sub-folder from a folder selected for backup. However, each time I clear the check box, the directories become obsolete in the backup set. How do I fix this?
- The backups are taking a long time to complete and there is a 'Retrying…' message in my logs.
- The message Checking for status… is displayed for a long time while performing the Backup/ Restore' operation. Why?
- I am receiving a message Server name or address could not be resolved. Why?
- I am trying to backup Microsoft SQL Server database files (.mdf, .ldf) but the application is not backing up these files. Can I backup MS SQL Server using IBackup?
- Can I backup MS Exchange Server database files (.edb, .stm etc) using IBackup?
- How can I update to a new version of IBackup automatically?
- Does IBackup desktop application support localization?
- How to retrieve messages/ information into the personal folders of Microsoft Outlook from the backed up .pst files?
- When I try to import my Outlook.pst file, I get an error message stating that this file is not a personal folders file?
- How do I uninstall the IBackup app from my computer?
General
IBackup is a reliable online backup and restore service that safeguards your critical data in case of system crash with automatic data backups.
You can customize your backup set, schedule backups, view backup reports and more using your IBackup account. Data is transferred and stored using 256-bit AES encryption with a user-defined key that is not stored anywhere on the servers. This ensures data is safe and secure.
The graphical interface makes it easy to navigate through the application. Key features include bandwidth throttle, data compression, and incremental backups that ensure fast backups, restore of previous versions of files, archive cleanup, open/locked file, and mapped drive backup among others.
You can backup data from multiple computers to a single IBackup account. Download the application.
Does IBackup use Delta Blocking technology?
Yes. IBackup uses Delta Blocking technology during data transfer. Delta blocking is an advanced logic that divides all files into equal sized blocks. When a file is detected for changes, the checksum of each block of that file is compared with the checksum for the same block of the same file. Any blocks that are found to be different are pulled out and transmitted. These delta blocks are compressed and encrypted before transfer.
Does IBackup support my native character set?
Yes. IBackup supports character sets of most major languages like English, French, Spanish, German, Hebrew, Italian etc.
How to install IBackup silently from command line?
Use the below command to install the IBackup application silently.
Command: "IBackupsetup.exe" /verysilent /noicons /suppressmsgboxes /DIR= <DIRECTORY PATH> /nocloseapplications
Example: "IBackupsetup.exe" /verysilent /noicons /suppressmsgboxes /DIR=”C:\ProgramFiles\IBackupWindows” /nocloseapplications

Quota
If I keep on performing backups, will I use up my quota quickly?
IBackup does incremental backup (only the modified portion of your files/folders are sent to the IBackup servers). Your quota depends on the most recent file/folder copy backed up to your online account. The previous 10 versions of files are stored free.
I received a quota overuse email. What should I do?
You may opt to upgrade your account to accommodate the extra storage or remove some data from your account to bring it in line with your current quota. To upgrade your account, you have to contact the IBackup support team. Log in to your IBackup desktop application and click 'Upgrade' to get the contact information of the IBackup support team.
Alternately, select the ‘Backup sets’ that you want to delete and click  icon.
icon.
Note: IBackup provides on demand storage for paid accounts with an additional charge of $2/GB.
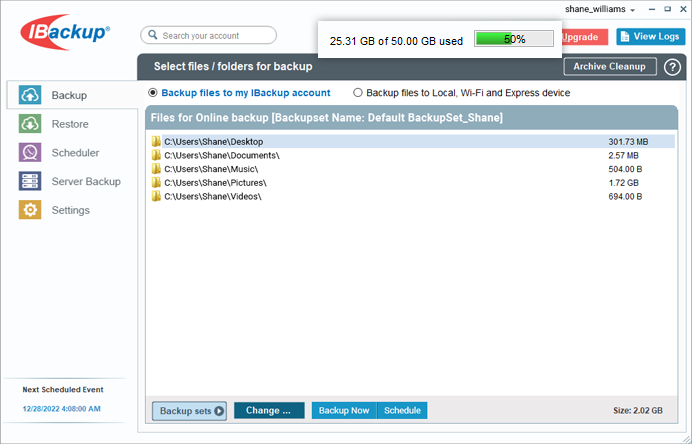
I have deleted some unwanted files/folders from my IBackup account. However, the display of the total storage space used does not change. How do I know the exact quota used?
The information of the total storage space used is not displayed in real-time. It is computed on a periodical basis. For updated information, click the quota display area (refer image), the quota used will be recalculated. For accounts with a large number of files, the process may take time.
Backup
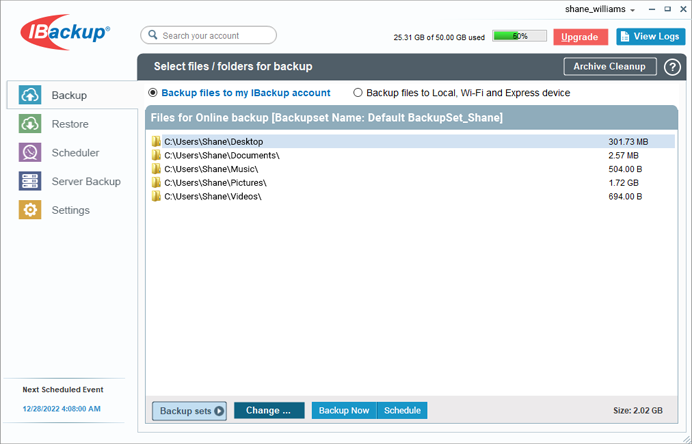
How do I take an immediate backup of my files?
To perform an immediate backup, select the desired files/folders/drives, under the Backup tab and click the 'Backup Now' button.
How can I take an immediate backup without signing into the application?
Right-click the 'IBackup Tray' icon and select 'Scheduler' > 'Manage all scheduled jobs'. In the Manage all Scheduled Jobs screen, select the 'Start the backup immediately' check box. Click 'Save Changes'. This will immediately execute backups for the backup set, provided you have created one and logged into the application at least once before.
By default, the IBackup application transfers only the modified portions of your backed up files after full initial backup. This optimizes your bandwidth usage and ensures that backups are quick.
To schedule a backup, log into IBackup desktop application and click the 'Scheduler' tab.
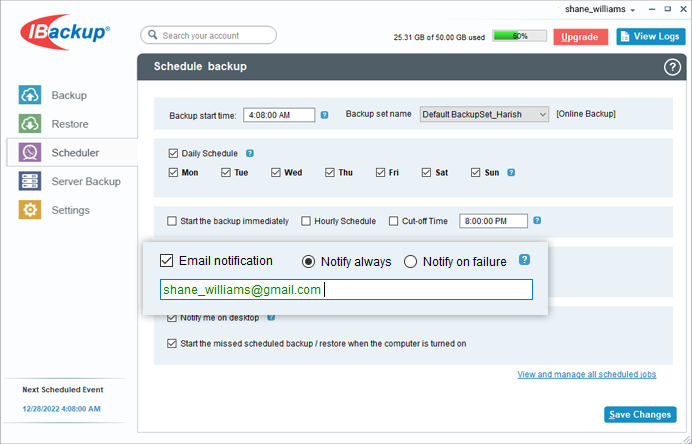
You can schedule your backup start time. Select your desired day(s) of backup in a week or schedule it on a daily basis. The screen contains the following options:
Backup start time: Set the time at which your scheduled backup should start.
Backup set name: Select the backup set that you want to schedule for backup.
Daily Schedule: To run your backup jobs daily, select this option.
Week-Day(s): Select the days of the week on which you wish to run your backup jobs.
Start the backup immediately: Select this option to run a backup job immediately.
Hourly Schedule: Select this option to configure hourly backup operations.
Cut-off Time: Set the time at which your scheduled backup should stop. This is helpful if you want to hard stop the backup progress at a specific time.
Email notification: Enter your email address to receive backup status notifications.
Notify me on desktop: Select this option to receive backup notifications on your desktop.
Start the missed scheduled backup when the computer is turned on: If you select this option, your missed scheduled backups will start automatically once you turn on your computer.
Does IBackup perform scheduled backups in Standby mode?
No. This is because the remote access connections are disconnected without any prompt to disconnect manually before the computer goes into the Standby mode. This applies to any remote access connection including connections to Internet service providers (ISPs) and private networks. This is a default behavior in windows.
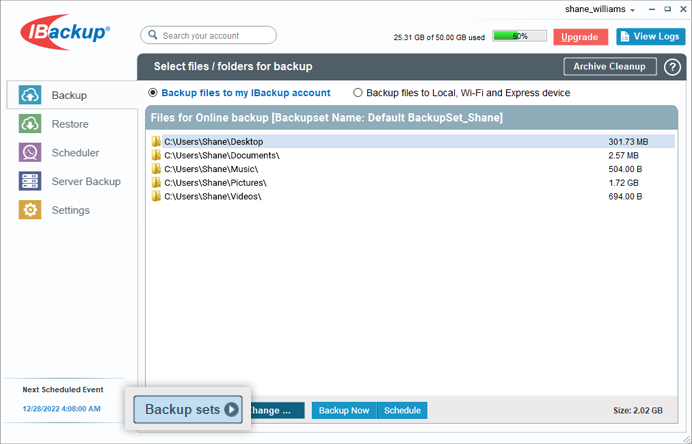
How do I create multiple backup sets?
You can create as many backup sets as needed.
To create a backup set,
- Log in to your IBackup desktop account.
- Select 'Backup' tab and click 'Backup sets'.
- Click
 and
and  .
.
- Enter a name for the backup set in the 'Create new backup set' window.
- Click 'Save' and a new backup set will be created.
You can find the newly added backup set in the list of available backup sets from the dropdown.
How do I schedule different backup sets?
You can set a different schedule for every backup set, as per your convenience. To schedule a particular backup set, click the 'Scheduler' tab, select a backup set from the Backup set name drop-down list, and corresponding to it, select the following scheduler parameters as needed. Click 'Save Changes'.
- Backup start time: Set the time at which your scheduled backup should start.
- Backup set name: Select the backup set you need to schedule ('DefaultBackupSet/LocalBackupset').
- Daily Schedule: To run your backup jobs daily, select this option.
- Week-Day(s): Select the days of the week on which you wish to run your backup jobs.
- Start the backup immediately: Select this option to run a backup job immediately.
- Hourly Schedule: Select this option to configure hourly backup operations.
- Cut-off Time: Set the time at which your scheduled backup should stop. This is helpful if you want to hard stop the backup progress at a specific time.
- Email notification: Enter your email address to receive backup status notifications.
- Notify me on desktop: Select this option to receive backup notifications on your desktop.
- Start the missed scheduled backup when the computer is turned on: If you select this option, your missed scheduled backups will start automatically once you turn on your computer.
The schedules of multiple backup sets can overlap each other; the schedule overlap does not affect the backup process.
How do I view the status of my scheduled backups?
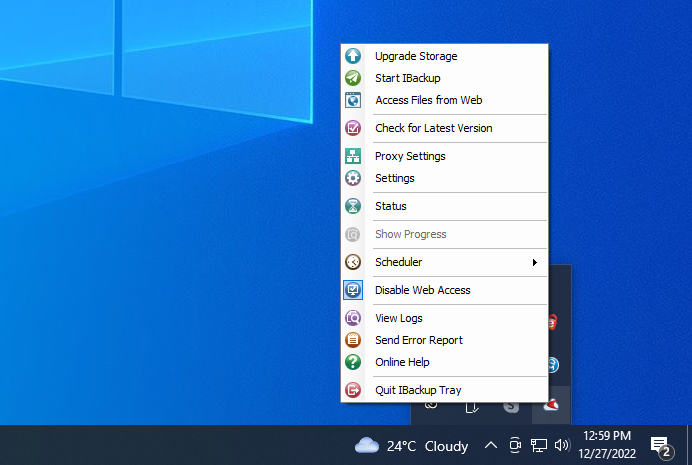
You can view the status of your scheduled backups by hovering over the IBackup tray. Alternatively, right-click the IBackup tray and click 'Status' to view the details of scheduled backups. To view the recent session-wise log files, right-click the IBackup tray and click 'View Logs'.
Can I use IBackup to schedule full and incremental backups on specific days?
IBackup does not have the conventional concept of full and incremental backups. Every backup is basically a full backup with incremental effect.
Unlike the conventional concept of incremental backups where only the changed data is stored separately from full backup with IBackup, the changed data is overwritten on the existing backup. In other words, you have full backup results every time.
IBackup uses the advanced patching technology to determine the changed data at source and applies only modified blocks of the changed files to the data that has been backed up.
Can I view the report of all my schedule backups?
Yes. To view the scheduled backup reports,
- Log in to your IBackup desktop application.
- Click your username at the top-right corner and select 'Account Settings'.
- Go to 'Events' tab and specify the date range for which you want to view the reports.
- Click 'View Report' and a summary of all the scheduled backups for the specified date range appears.
By default, a report for the last seven days is displayed.
Is it possible to view all the scheduled backup/restore jobs of all my IBackup accounts on my computer?
Yes. Right-click the 'IBackup Tray' icon and go to 'Scheduler' > 'Manage all Scheduled Jobs'. The scheduled backup/restore jobs of all IBackup accounts on the local computer are listed.
I had enabled the Relative Path for backup, but now I am unable to change it. How do I change the settings?
Latest version of IBackup backs up data by maintaining its absolute file path structure. If you are looking for 'Relative Path' backup, then download and install the custom setup from here. Download
How do I backup data from multiple computers to a single IBackup account?
To backup files from multiple computers,
- Download and install IBackup on all the computers that are to be backed up.
- Login if you have an existing IBackup account or create a new account.
- After logging in, IBackup will create a default backup set which includes all the important folders from your computer.
- Click 'Backup Now' to start the backup immediately.
By default, IBackup creates unique folders with the name of the computer in a single account. This ensures no data overlap during multiple computer backups.
If I am backing up data from multiple computers, do I need to change the backup location?
No, you do not have to change the backup location as IBackup by default creates a unique folder with the computer name, to prevent data overlap if you are backing up data from multiple computers.
However, if the computer names are the same, we recommend you to use the Backup location feature to change the default backup location, to prevent data overlap.
How do I change the default backup location?
IBackup by default creates a unique folder with the name of the computer to backup data to your IBackup account.
To change the default backup location,
- Right-click the 'IBackup Tray', select 'Settings'.
- Under Backup location on your IBackup account, you can enter a folder name of your choice.

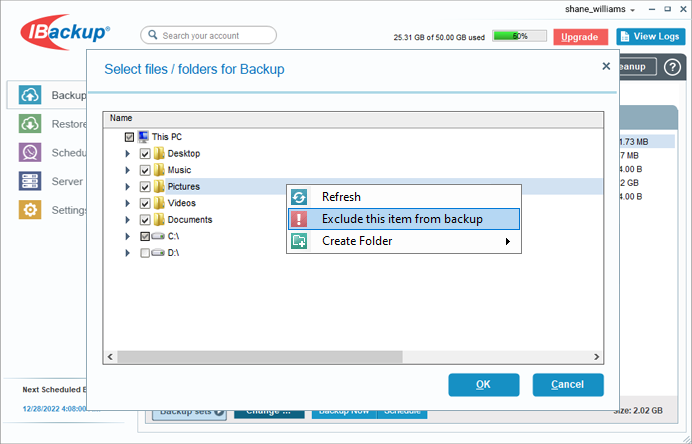
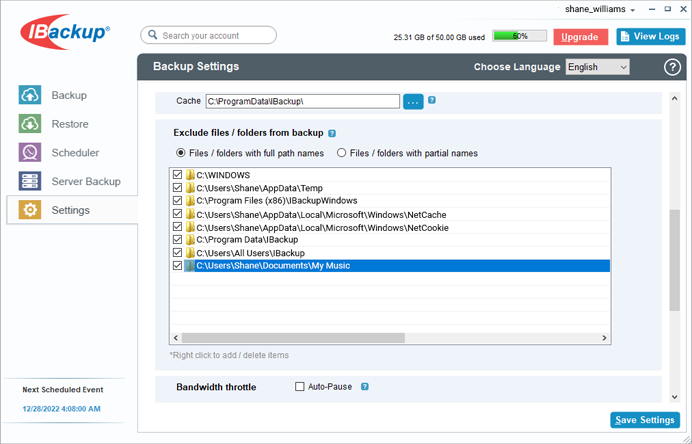
How can I exclude certain files/folders from being backed up?
IBackup allows you to exclude files/folders from being backed up during interactive and scheduled backup. You can exclude files/folders in the following ways:
Via Main Window
To exclude any file and folder from your backup operations
- From the 'Backup' tab, click 'Change…'.
- Right-click on any file/folder and choose 'Exclude this item from backup' and click OK.
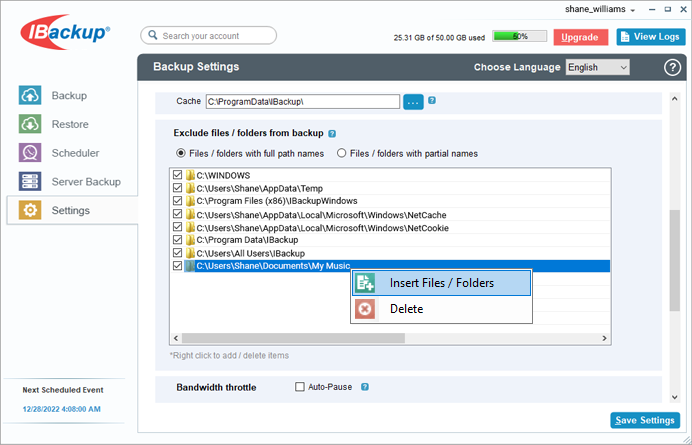
Based on full path names
- Log in to your IBackup desktop application.
- Go to 'Settings' tab and click 'Files/Folders with full path names' under 'Exclude files/folders from backup' to view the excluded files.
- Right-click anywhere on the list box, and select 'Insert Files /Folders'.
- Browse and select a file, and click 'OK'.
- After adding all the files, click 'Save Settings' to save the changes.
To delete a file from the exclude list, right-click a file and click 'Delete'.
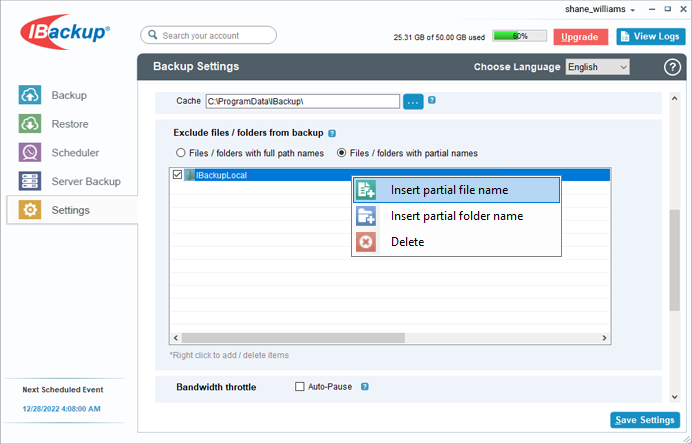
Based on partial names
- Log in to your IBackup desktop application.
- Go to 'Settings' tab and click 'Files/Folders with full path names' under 'Exclude files/folders from backup' to view the excluded files.
- Select 'Files/folders with partial names'.
- Right-click anywhere on the list box, and select 'Insert partial file name' or 'Insert partial folder name'.
- Enter the partial file / folder name you want to exclude from backup and click Save Settings'.
To delete a file from the exclude list, right-click a file and click 'Delete'.
Note:
- The excluded folders are marked in red color under the directory.
- To backup an item which is on the exclude list, right-click the corresponding list box and select 'Delete' from the sub-menu.
- Files and folders excluded by default, such as system files and temporary files cannot be removed from the list.
How will I be notified of the status of my backup jobs?
You may opt to receive email notifications on the status of your scheduled backup jobs.
To receive email notifications,
- Log in to your IBackup desktop application.
- Go to the 'Scheduler' tab and click 'Email notification'. Enter the email address where you wish to receive the notifications.
- Click 'Save Changes' and you will not be able to receive notifications.
Alternatively,
- Right-click 'IBackup Tray' from the taskbar and select 'Scheduler' > 'Manage all scheduled jobs'.
- Click 'Email notification' and enter the email address to receive notifications.
- Click 'Save Changes' to receive notifications.
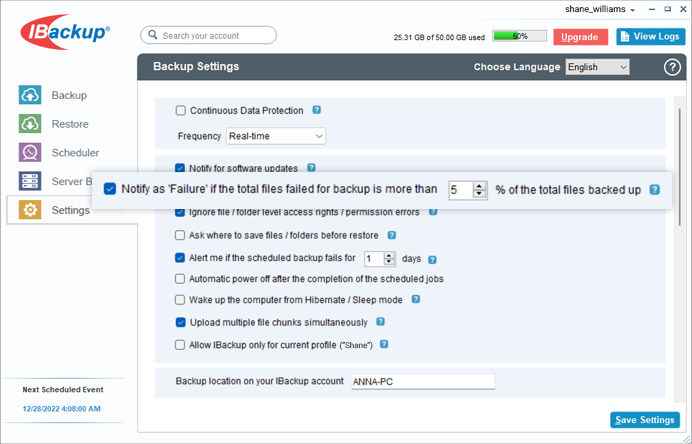
Is there a way to receive an alert in case my backup fails?
Yes, to receive an alert in case of backup failure, select the following options from the IBackup 'Settings' tab:
- 'Alert me if the scheduled backup fails for <selected_number_of_days> days' check box to receive a desktop alert in case your backup has not taken place.
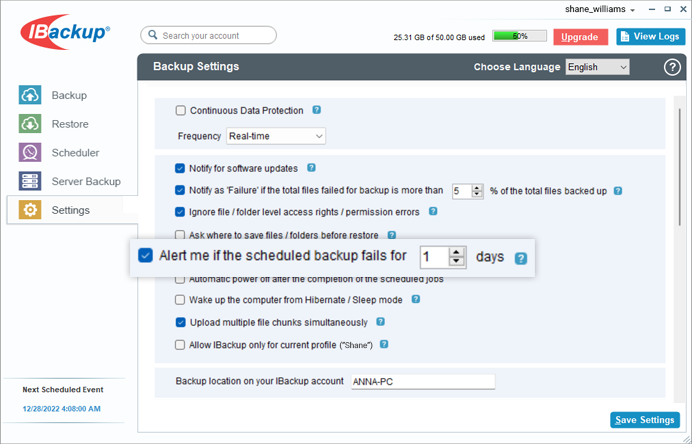
- 'Notify as 'Failure' if the total files failed for backup is more than <number_of_files> of the total files backed up' check box to receive a desktop alert.
Is there a way to delete the scheduled backup/restore jobs?
To delete the scheduled backup/restore jobs,
- Right-click the 'IBackup Tray' and go to 'Scheduler' > 'Manage all scheduled jobs'.
- Select the redundant schedules from the list and click 'Delete'
- Click 'Yes' in the confirmation pop-up window and the backup/restore jobs will be deleted.
How do I view the log reports?
- Log in to your IBackup desktop application.
- Click 'View Logs' at the top-right corner of the window. Alternatively, right-click the 'IBackup Tray' and click 'View Logs'.
- The details of all the activities will be displayed.
Can I halt my scheduled backups at a particular time?
Yes. Using the Cut-off Time option, you can stop the scheduled backup at the specific time. The backup is resumed at the next scheduled time from the point it was stopped. Click the 'Scheduler' tab, select the 'Cut-off Time' option using the checkbox and set the time, when you want the backup to stop. Click 'Save Changes'.
Does IBackup support backup and restore of files larger than 2 GB?
Yes. IBackup has been tested to transfer files both ways for files of size up to 10 GB.
What does IBackup do if the Internet connection is interrupted during a backup session?
IBackup resumes the backups from the file at which interruption occurred. If partial transfers had taken place prior to interruption, it will continue from that partial transfer point.
When will IBackup resume the session if it has been missed (example, The computer has been abruptly turned off) or interrupted?
IBackup will resume the scheduled backup job(s) at the next transfer time, as per the scheduled time.
How do I locate files in my account using IBackup?
You can locate files backed up to your IBackup account by clicking the 'Search your account' on the main window. Enter the search term (the file name or a part of the file name) to locate files/folders.
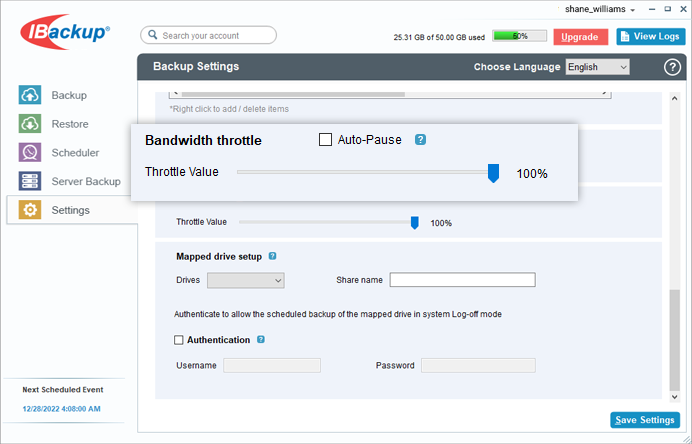
How do I regulate my Internet bandwidth for IBackup?
The Bandwidth Throttle lets you set the Internet bandwidth to be used by the IBackup application for backups. By default, the bandwidth throttle value is set at 100%. You can set Auto Pause option, which makes intelligent guesses on bandwidth throttle during backup operation to enable optimum desktop experience with the following options:
PC in use: This option lets you set the bandwidth to be used by IBackup for backups, when it is in use. By default, it is set to 25%. This allows other applications to run without hindrance.
PC not in use: This option lets you set the bandwidth to be used by IBackup for backups when it is not in use. By default, it is set to 100%.
Note: The percentage set for Bandwidth Throttle is applicable for both scheduled and interactive backups.
Can I change my IBackup password while in the middle of a scheduled backup?
Changing your account password during backup is not recommended as this will result in transfer errors. If you change your password, ensure that you logout from the application and log in with the new password and then reschedule your backups.
Can IBackup work with virtual machines?
Yes, IBackup works with virtual machines. For this, install the application on virtual machines and perform the backup as usual.
Mapped drive and open file backup
Does IBackup support backup of mapped drives?
Yes. IBackup supports mapped drive backup on Windows systems, provided the computer is not logged off.
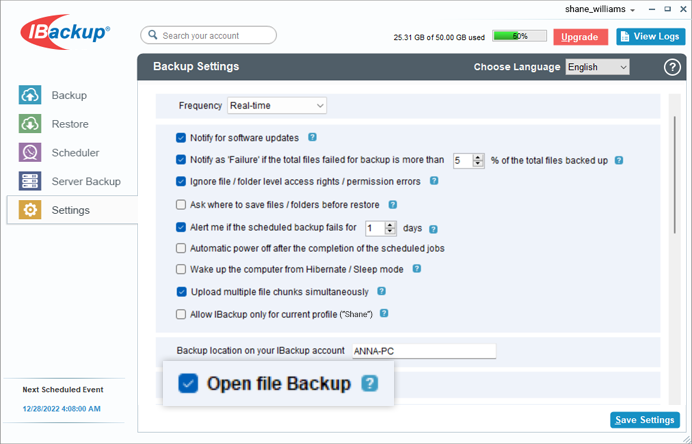
Can I backup open files with IBackup?
Yes, you can backup open files using the Open file Backup feature of IBackup on Windows 7, Vista, XP and Windows 2003, 2008 servers and higher operating systems. The Open file Backup feature is enabled by default. The most common open files that can be backed up include Outlook files (.pst), QuickBooks, Quicken, ACT, MS-Money, MS-Word, MS-Excel, MS-Access, MS FoxPro etc.
If all my file system partitions are on FAT32, can I backup my open files?
No. Open file backups require at least one drive to be mounted on the New Technology File System (NTFS) file system partition. Also, the file system of at least one of the hard disk drives should be NTFS. (NTFS is one of the file systems the Windows NT operating system uses for storing and retrieving files on a hard disk).
Can I backup the MS Exchange Server and MS SQL Server related files using the open file backup feature?
Yes. However, it is recommended that you use the specific MS Exchange/MS SQL backup feature that is available with IBackup for consistent backup of your MS Exchange or MS SQL Server related files.
Can I backup open files, which are in the mapped/network drive(s), using the Open file Backup feature?
No. The Open file Backup feature does not support backup of open files on the mapped/network drive(s).
Can I backup Mapped / USB / External drives?
Yes, you can backup Mapped / USB / External Drives. The contents to be backed up must be a part of the Backup set and available at the time of backup.
Continuous Data Protection
What is Continuous Data Protection (CDP)?
The Continuous Data Protection (CDP) feature automatically recognizes the changes made to the files in the default backup set and backs them up almost real-time or as per the set frequency.
The temporary files, system files, and mapped drives are excluded from the operation. CDP is not a replacement for the traditional schedule backup feature but works along with the scheduled backup to provide timely protection for your data.
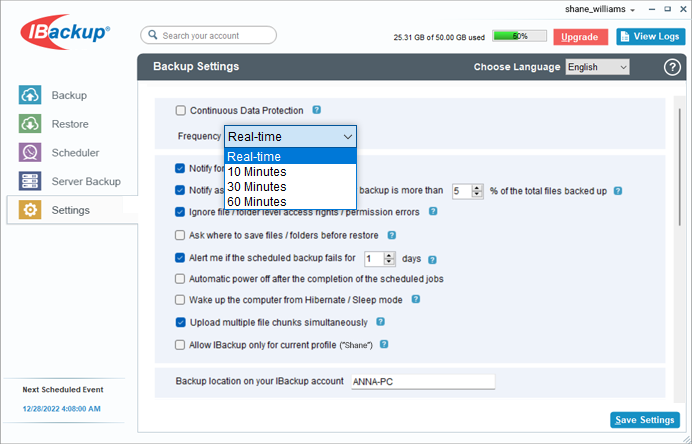
Can I set the frequency of backups under Continuous Data Protection feature?
Yes, to customize the frequency of backups,
- Log in to your IBackup desktop application.
- Go to the 'Settings' tab and select 'Continuous Data Protection'.
- Set the frequency (Real-time/10 minutes/30 minutes/ 60 minutes) and click 'Save Settings' to enable Continuous Data Protection for your data.
What are the advantages of Continuous Data Protection?
Continues Data Protection has the following advantages:
- It prevents loss of data as the modified contents of the files are backed up automatically in real-time.
- You can accurately restore up to 10 recent versions of all backed up files in your account.
Will the scheduled backups occur even when the Continuous Data Protection feature is enabled?
Yes. The Continuous Data Protection feature is designed to backup files in real-time. It is not a replacement for the scheduled backup operation - which backs up all the files in your backup set and takes place even if you have enabled Continuous Data Protection.
The Continuous Data Protection will stop during the scheduled backup and resume once the scheduled job is complete.
Versioning
How many prior versions of a file are stored in my account?
The IBackup application maintains the history of changes made to all the backed up files. The recent 10 versions of a file are available for restore.
The additional storage requirement for the previous versions has no impact on your account's space, as your storage is computed only for the most current version.
How do I restore any particular version of a file?
To restore any particular version of a file,
- Log into IBackup desktop application and click the 'Restore' tab.
- Select 'Online Account' from the 'Select files/folders for restore' drop-down menu.
- Right-click the required file and select the 'View previous versions' option. The Previous versions section is displayed.
- Select a version to restore and click 'Restore Now' button.
- Choose the restore destination on your local computer and click 'Restore'.
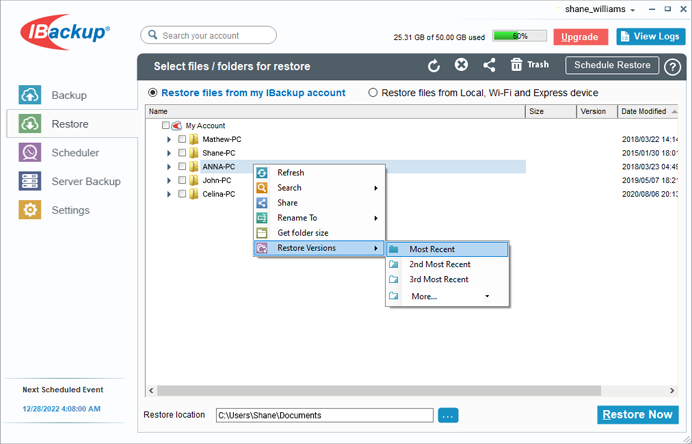
Does IBackup support folder-wise restore of files with earlier versions?
Yes, to restore a folder with earlier versions of files,
- Log in to your IBackup desktop application and go to the 'Restore' tab.
- Right-click on the required folder and click 'Restore Versions'. You can choose one among the following options:
- Most Recent - Use this option to restore all the latest versions of files in the folder.
Example: If a folder has 5 files, all the 5 files will be restored in its latest versions available. - 2nd Most Recent - Use this option to restore files prior to the last backed up version.
Example: If a file in the folder has 3 different versions, this feature will restore only the version prior to the last backed up, i.e., file version 2. - 3rd Most Recent - Use this option to restore the third last version of a file in a folder.
Example: If a file in the folder has 3 different versions, this feature will only restore file version 1. - More - Provides an option to restore from fourth to tenth most recent version of files in a folder.
Share
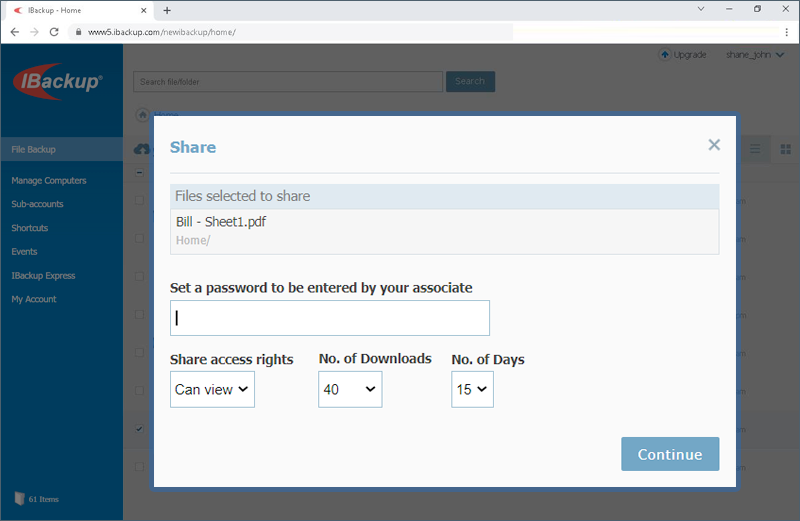
How do I share files or folders directly from IBackup?
To share files and folders,
- Log into IBackup desktop application and click the 'Restore' tab
- Select files or folders and click the
 icon on the tool bar.
 - You will be re-directed to the web account, from where you can set the share parameters.
- Enter the password that must be entered by your associate for authentication.
- Choose the access rights and set limits to the number of days to access and downloads.
- Enter the recipient’s email address, a note to the recipient, and click 'Send email'
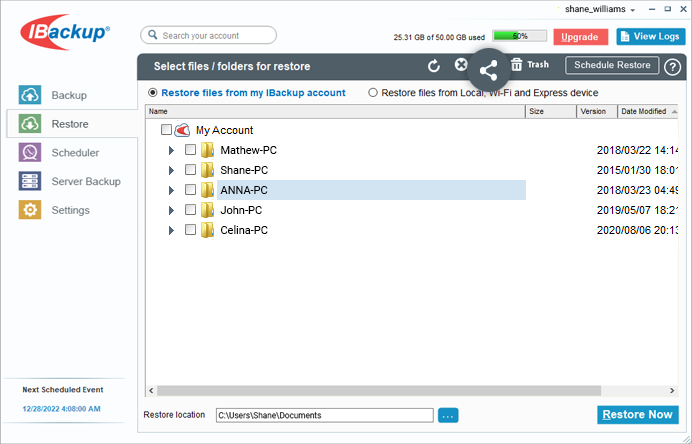
Note: Sharing option is available only for IBackup accounts with default encryption.
Restore
How do I restore files or folders from my IBackup account?
To restore files or folders,
- Log in to your IBackup desktop application
- Go to the ‘Restore’ tab and select ‘Restore files from my IBackup account.
- Select the files and folders you want to restore. Click
 and set the restore location on your computer and click ‘Select’.
 - Click ‘Restore Now’ and all the selected files and folders will be restored on your computer.
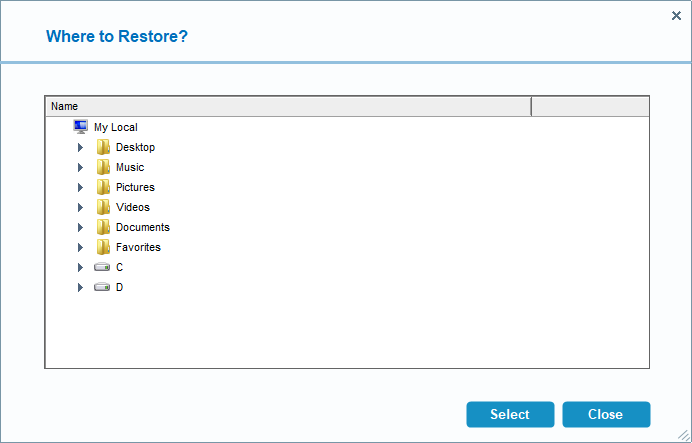
Note: Files or folders if they already exist are overwritten.
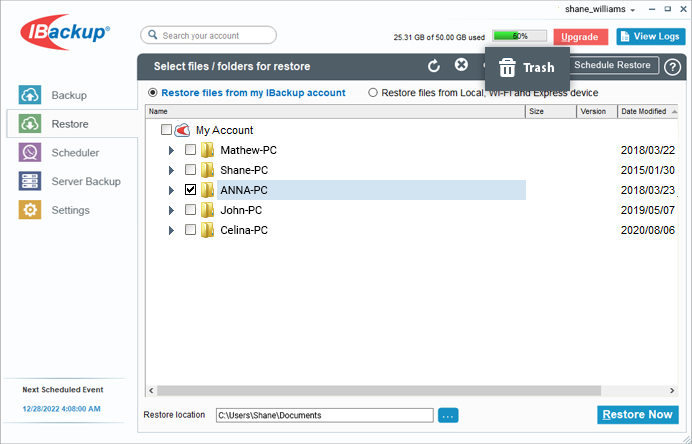
Is it possible to restore the files/folders that are accidentally deleted from my IBackup account?
All the files or folders that are deleted from your account are moved to Trash. You can either move your files/folders to the original location in your IBackup account or restore them to your local computer. The files/folders present in Trash will automatically get deleted after 30 days.
To restore your files from Trash,
- Log into IBackup desktop application and click the 'Restore' tab.
- Click '
 trash' on the toolbar. The files/folders available in Trash are listed with the latest version.
 - Select the files using the check boxes to restore.
- Click the
 icon to move the files/folders to the original location in your IBackup account, or click the
  icon to restore your files/folders to the desired location in your local computer.
Can I restore the previous version of a file from Trash?
Yes, you can restore the previous version of a file from Trash.
- Log into IBackup desktop application and click the 'Restore' tab.
- Right-click the desired file and select the 'View previous versions' option.
- Select the required version and the restore location and click icon.
Can I schedule the restore of my backed up data to my local machine?
Yes. You can schedule the restore of backed up data from your IBackup account.
For this, select the desired files/folders under the Restore tab and click the 'Schedule Restore' button. Click 'Yes' to confirm schedule restore. Set the options as required.
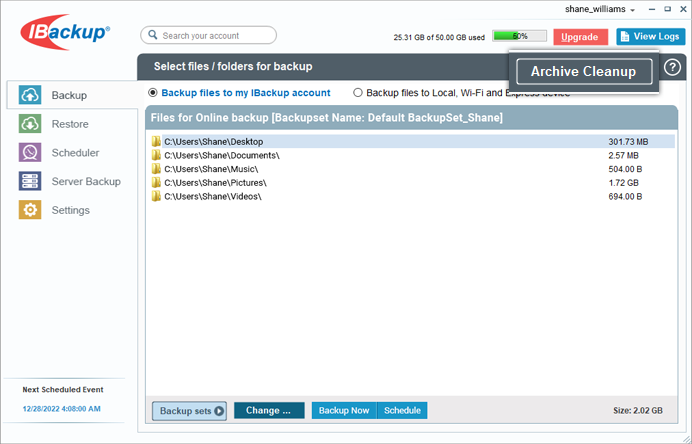
Archive Cleanup
The Archive Cleanup feature permanently deletes data from your account, by matching them to the data in your current backup set. It is useful as it deletes data from your account that no longer exists on your computer.
To use Archive Cleanup,
- Log in to your IBackup desktop application and go to the ‘Backup’ tab.
- Click 'Archive Cleanup', under the Backup tab.
- Click the 'Cleanup Now' button. IBackup will generate a list of items to be deleted from your account.
- Click 'Delete', to remove data from your account.
Note:
- Archive Cleanup has controls to avoid inadvertent data deletion. It by default considers up to 25% of files for deletion. You can also regulate the percentage according to your preference.
- The percentage mentioned refers to files considered for deletion in your account as a percentage of the total number of files. The purpose of this percentage based control is to avoid large-scale deletion of files in your account due to some unforeseen event on your computer.
- It permanently deletes data which no longer exists on your computer to free up space in your account.
- Archive Cleanup is not supported for mapped and USB drives.
You can set up automated cleanup periodically by enabling Periodic Cleanup.
Periodic Cleanup gives you more control by allowing you to set the frequency as well as the percentage of files to be considered. The frequency can be set to anything between 10 and 30 days; percentage to anything between 5% and 25%.
To enable Periodic Cleanup,
- Log in to your IBackup desktop application and go to the 'Backup' tab.
- Click 'Archive Cleanup', under the Backup tab.
- Select 'Periodic Cleanup' by using the check box.
- Set the number of days and percentage of data to be considered for cleanup.
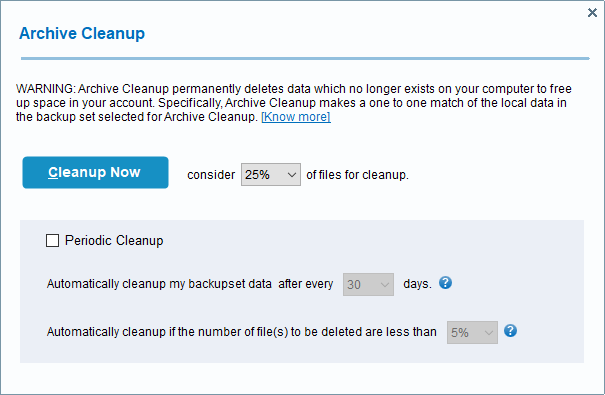
Note:
- Periodic Cleanup may result in automatic deletion of data from your IBackup account; use/set this option carefully.
- The percentage mentioned refers to files considered for deletion in your account as a percentage of the total number of files. The purpose of this percentage based control is to avoid large deletion of files in your account due to some unforeseen event on your computer.
- Periodic Cleanup is not supported for mapped and USB drives.
Security
Is my data secure with IBackup?
IBackup uses industry standard 256-bit AES encryption on transfer and storage. Data stored at our world-class data centers is encrypted using the encryption key (known only to you. If you have set the private encryption key).
WARNING: IBackup does not store your private encryption key on its servers. It is recommended that you archive it safely to backup and restore your data. However, if you opt for the default encryption key, you need not remember it.
What is two-factor authentication?
The two-factor authentication provides additional security to your account and helps in preventing unauthorized access. Once two-factor authentication is enabled via web, in addition to your password, you will need to enter a verification code sent to your email address or phone number or Time-based OTP authenticator app, while signing in to your IBackup account. Read more on how to enable two-factor authentication for your IBackup account.
How do I sign in to my IBackup account once two-factor authentication is enabled?
To sign in to your IBackup account after two-factor authentication is enabled,
- On the IBackup application sign in screen, enter your username and password and click 'Sign in'.
-
If you have selected 'Email Address' or 'Phone Number' as the preferred method of receiving a one-time verification code, enter the code sent to your email address or phone number and click 'Verify & Enable'.
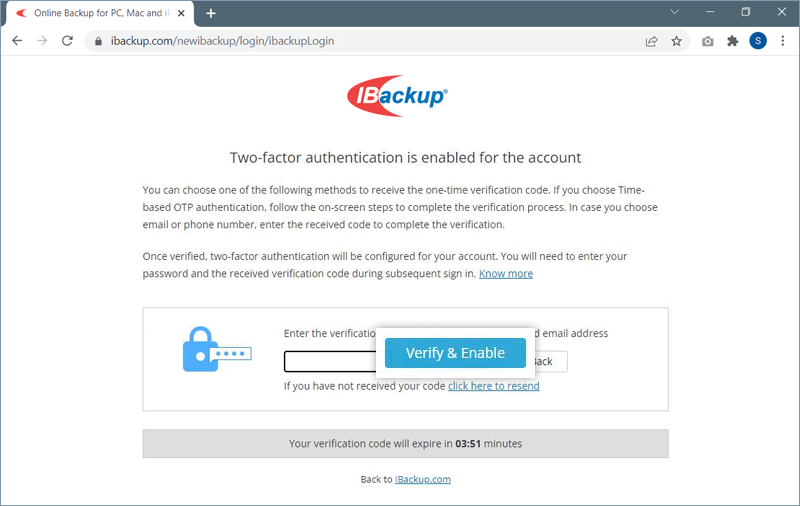
- If you have selected 'Time-based OTP Authentication' as the preferred method of receiving one-time verification code, enter the one-time code generated by the Time-based OTP Authenticator app in your mobile device and click 'Submit Code'.
Common User Queries
On reboot, IBackup does not connect. Why?
This issue may be caused because of Firewall restrictions, especially if they are not set to start automatically on reboot. If the firewall does not restart automatically on reboot, the necessary permissions provided by firewall to run IBackup may be lost, however, the firewall controls are still in place even if the firewall is not running and does not let IBackup to run.
To resolve this, start the firewall if it is not running and then attempt to start IBackup, then provide the required permissions if it prompts.
I am not receiving email notification for the scheduled backup jobs. Why?
Step 1: Ensure that the Email notification check box is selected in the Scheduler tab and the email address provided by you is valid.
It is possible that the email notifications from IBackup are reaching the Spam or Bulk folder of your email box.
Step 2: Ensure that your computer does not go to Sleep or Standby mode so that the scheduled backups take place without fail and the email notification is sent to you. For confirmation of the backup process, you can view the application logs by clicking the 'View Logs' option.
Some of the files or folders selected for backup are not getting backed up. How can I make the application consider these files or folders for backup?
Ensure that the files or folders are not on the Exclude list. You can view the excluded file or folder list by clicking the 'View Excluded Files' from the 'Backup' tab.
If the files or folders, which are not on the Exclude list and are still not getting backed up, then contact IBackup Technical Support for assistance.
My backups are not taking place for a few days. Why?
Ensure that you have selected the days when backup has to be performed in the Scheduler tab. Also, make sure that your computer does not go to Sleep or Standby mode when you have backups scheduled. If the issue persists, contact IBackup Technical Support for assistance.
I wish to remove a sub-folder from a folder selected for backup. However, each time I clear the check box, the directories become obsolete in the backup set. How do I fix this?
If you wish to remove a file/sub-folder from a folder selected for backup, yet maintain the folder's generic name in the backup set, do not clear the selection; simply exclude the file/folder from backup. To exclude, right-click the file and choose 'Exclude this item from backup' option.
The backups are taking a long time to complete and there is a 'Retrying…' message in my logs.
This issue may be caused because of your Firewall restrictions. Configure your Firewall to allow all the executables of IBackup to access the Internet. This issue may also occur if you are trying to backup open/locked files, for example Outlook.pst.
The message Checking for status… is displayed for a long time while performing the Backup/ Restore' operation. Why?
This may happen if some executable files of IBackup are not allowed through your firewall. Configure your firewall to allow all executables of IBackup to access the Internet.
I am receiving a message Server name or address could not be resolved. Why?
This may happen if some executable files of IBackup are not allowed through your firewall. Configure your firewall to allow all executables of IBackup to access the Internet. If the issue persists, contact IBackup Technical Support for assistance.
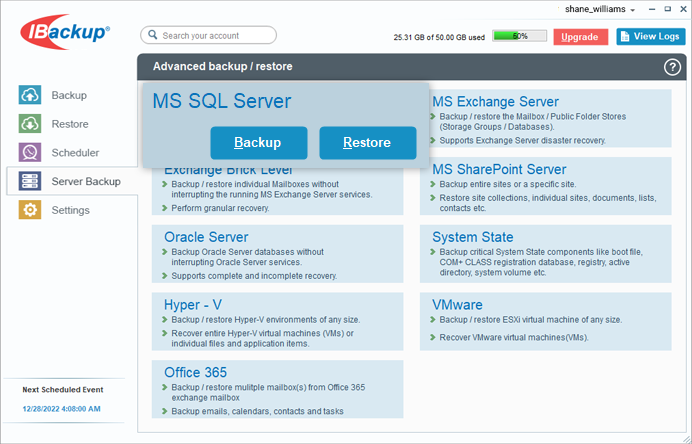
I am trying to backup Microsoft SQL Server database files (.mdf, .ldf) but the application is not backing up these files. Can I backup MS SQL Server using IBackup?
Yes. IBackup supports the backup of MS SQL Server. The MS SQL Server database files cannot be backed up directly. Use the SQL Server backup feature to backup the MS SQL Server database files. For this, on the application menu bar, go to 'Server Backup' > 'My SQL Server' > 'Backup'. For more information on SQL Server Backup, click here.
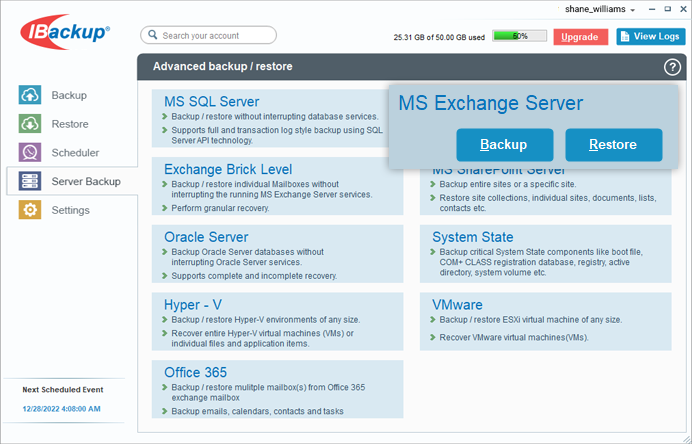
Can I backup MS Exchange Server database files (.edb, .stm etc) using IBackup?
Yes. IBackup supports the backup of MS Exchange Server database files. To backup MS Exchange Server database files (.edb, .stm etc), use the Server Backup option. For this, on the application menu bar, go to 'Server Backup' > 'MS Exchange Server' > 'Backup'.
How can I update to a new version of IBackup automatically?
To update to the latest version, right-click the 'IBackup Tray' icon and select 'Check for Latest Version'.
Does IBackup desktop application support localization?
Yes. Currently, the IBackup desktop application for Windows supports four languages - English, Spanish, French, and German.
How to retrieve messages/ information into the personal folders of Microsoft Outlook from the backed up .pst files?
Download or restore the .pst files to a folder on your local computer from your online account and start the Microsoft Outlook application.
On the menu bar, go to 'File' > 'Import and Export' > 'Import from another program or file' and click 'Next'. Choose 'Personal Folder File (.pst)' and click 'Next'. Browse the directories to select the .pst file that you have downloaded from your IBackup account and click 'Next'. Highlight the folder that you would like to import. Select the option 'Import items into the same folder', choose 'Personal Folders' and click 'Finish'.
When I try to import my Outlook.pst file, I get an error message stating that this file is not a personal folders file?
This error normally occurs if the Microsoft Outlook application was open during backup resulting in some portions of the file not being backed up correctly. To repair the Outlook.pst file restored from your IBackup account, run the Microsoft Inbox repair tool. For other platforms, similar tools may be available. After the repair is complete, import your files to the Outlook application again.
How do I uninstall the IBackup app from my computer?
To uninstall the app using Windows:
- Go to your start menu and select Settings > Control Panel.
- In 'Control Panel', depending on the version of Windows you are using, select either 'Add/Remove Programs' or 'Programs and Features'.
- From the list of programs, right-click on 'IBackup', and select 'Uninstall/Change'.
- The application will then be removed, but the data present in your IBackup folder will remain on the computer. To delete this, right-click the IBackup shortcut item and select 'Open folder location'. Then right-click the IBackup folder and delete it.