VMware
If your question is not addressed below, please contact us through our feedback form and we'll get back to you shortly.
- Does IBackup support incremental backups for VMware virtual machines?
- How do I disable Change Block Tracking (CBT) for VMware backup?
- Which ports are required by the IBackup application to perform backup and restore operations?
- How do I test the VMware connectivity to port 902?
- How can I backup my VMware virtual machine(s)?
- How do I view and backup virtual machines from vCenter?
- Can I backup VMware virtual machines to a network mapped drive or NAS drive?
- What are the system requirements for IBackup VMware backup?
- Do I need to turn off or shutdown the Virtual machine(s) in VMware manager to take a backup?
- How secure is data transfer during backup/restore using IBackup VMware backup?
- How do I restore virtual machine(s) to the VMware server?
- Can I restore VMware virtual machines from a network mapped drive or NAS drive?
- Is there a need for an additional/external storage volume for VMware Virtual backup?
- Can I attach a VMDK file from IBackup VMware Backup to a different VMware server?
Does IBackup support incremental backups for VMware virtual machines?
Yes, IBackup supports incremental backup for VMware virtual machines. To do so, you need to first enable Change Block Tracking (CBT).
To enable CBT,
- Power off the virtual machine.
- Right-click the virtual machine and click 'Edit Settings'.
- Click the 'Options' tab.
- Click 'General' under the 'Advanced section', and then click 'Configuration Parameters'. The Configuration Parameters dialog box appears.
- Click 'Add Row'.
- Add the ctkEnabled parameter, and then set its value to true.
- Click 'Add Row', add scsi0:0.ctkEnabled, and set its value to true.
Note: scsi0:0 in scsi0:0.ctkEnabled indicates the SCSI device assigned to the hard disk, which is added to the virtual machine. Every hard disk added to the virtual machine is given a SCSI device similar to scsi0:0, scsi0:1, or scsi 1:1. The CBT option is either enabled or disabled on each disk.
How do I disable Change Block Tracking (CBT) for VMware backup?
To disable CBT for VMware backup,
- Power off the virtual machine.
- Right-click the virtual machine and click 'Edit Settings'.
- Click 'Options'.
- Under the 'Advanced section', click 'General' and then click 'Configuration Parameters'. The 'Configuration Parameters' dialog opens.
- Set the 'ctkEnabled' parameter to false for the desired SCSI disk(s).
- Power on the virtual machine.
Which ports are required by the IBackup application to perform backup and restore operations?
Ports 443 and 902 should be open and accessible on the source host to perform backup and restore operations.
How do I test the VMware connectivity to port 902?
To test Port 902 on an ESXi host, run the following command:
C:\>telnet server 902
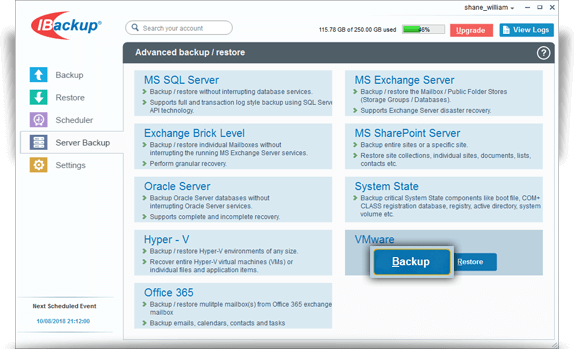
How can I backup my VMware virtual machine(s)?
To backup your VMware virtual machine(s),
- Log in to the IBackup application and click the 'Server Backup' tab.
- In the VMware Backup section, click 'Backup'. The VMware login screen appears.
- Select the ESXi 5.5 / 6.0 / 6.5 / 6.7 / 7.0 / 8.0 radio button.
- Enter valid credentials, and click 'Login to ESXi'.

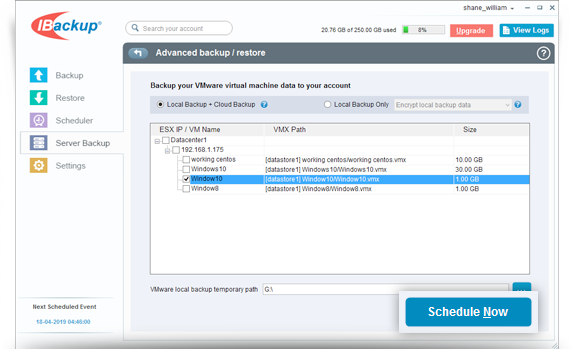
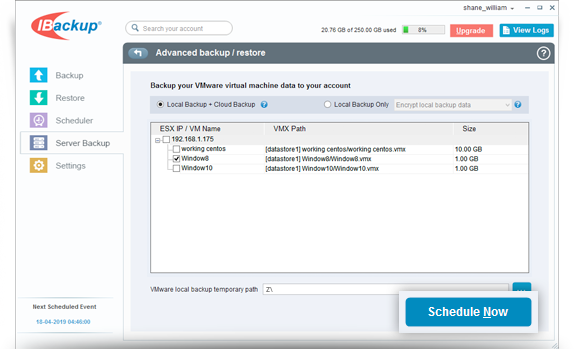
- Select the 'Local Backup + Cloud Backup' or the 'Local Backup Only' radio button.
- Select the virtual machine(s) from the list and specify a temporary local backup path.
- Click 'Schedule Now'. The 'Schedule Backup' screen appears, where you can schedule the backup for any future day and time or perform an immediate backup of the selected virtual machine(s).
How do I view and backup virtual machines from vCenter?
To backup multiple ESXi virtual machine(s),
- Log in to the IBackup application and click the 'Server Backup' tab.
- In the VMware Backup section, click 'Backup'. The VMware login screen appears.
- Select the 'vCenter' radio button.
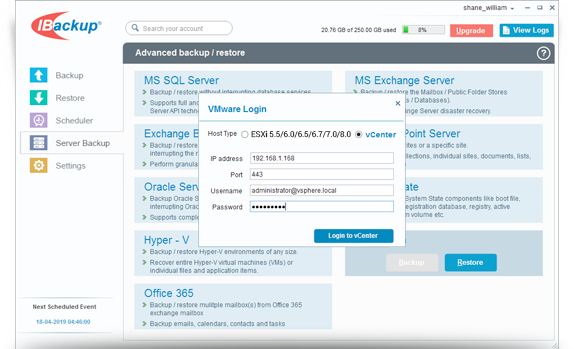
- Enter IP address, Username, Password, and click 'Login to vCenter'.
- Select the 'Local Backup + Cloud Backup' or the 'Local Backup Only' radio button.
- Select the virtual machine(s) from the list and specify a temporary local backup path.
- Click 'Schedule Now'. The 'Schedule backup' screen is displayed where you can schedule the backup for any future day and time or perform an immediate backup of the selected virtual machine(s).
Can I backup VMware virtual machines to a network mapped drive or NAS drive?
Yes, you can backup VMware virtual machines to a network mapped drive or NAS drive. While choosing a local backup path, select the network mapped drive / NAS drive and provide the necessary authentication.
To backup VMware virtual machine(s) to a network mapped / NAS drive,
- Log in to the IBackup application and click the 'Server Backup' tab.
- In the VMware Backup section, click 'Backup'. The VMware login screen appears.
- Select the 'ESXi 5.5/ 6.0 / 6.5 / 6.7 / 7.0 / 8.0' radio button.
- Enter the valid credentials and click 'Login to ESXi'.
- Select the 'Local Backup + Cloud Backup' or the 'Local Backup Only' radio button.
- Select the virtual machine(s) from the list.
- Select the network mapped drive / NAS drive as the temporary location and click 'Schedule Now'.
- Enter your username and password to authenticate network mapped drive / NAS drive and click 'Authenticate'.
- The Schedule backup screen appears. You can schedule the backup for any future day and time or perform an immediate backup of the selected virtual machine(s).
What are the system requirements for IBackup VMware backup?
The system requirements for IBackup VMware backup are:
- ESXi 5.5, ESXi 6.0, ESXi 6.5, ESXi 6.7, ESXi 7.0, ESXi 8.0
- Windows 64 bit operating system
- 2 GB RAM
- Sufficient hard disk space to store the virtual machine files for temporary backup and restore
Do I need to turn off or shutdown the Virtual machine(s) in VMware manager to take a backup?
No, you do not have to shut down your active virtual machine(s) to perform a backup. IBackup enables you to backup virtual machine(s) in their running state.
How secure is data transfer during backup/restore using IBackup VMware backup?
IBackup uses military grade 256-bit AES encryption to encrypt all data transferred during a backup / restore operation using IBackup VMware backup.
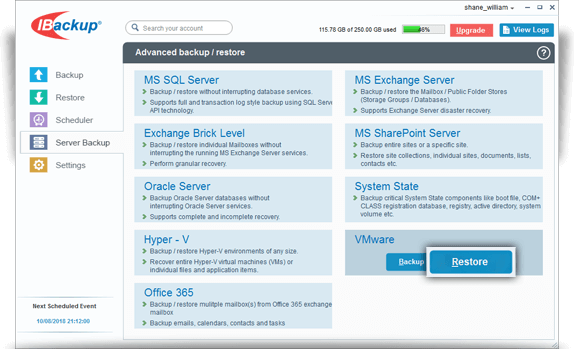
How do I restore virtual machine(s) to the VMware server?
To restore virtual machine(s) to the VMware server,
- Log in to the IBackup application and click the 'Restore' tab.
- Locate and select the 'IBVMwareBackup' folder in your IBackup account.
- Click 'Restore Now' to restore the 'IBVMwareBackup' folder to the local computer.
- Once the 'IBVMwareBackup' folder has been successfully restored, click the 'Server Backup' tab.
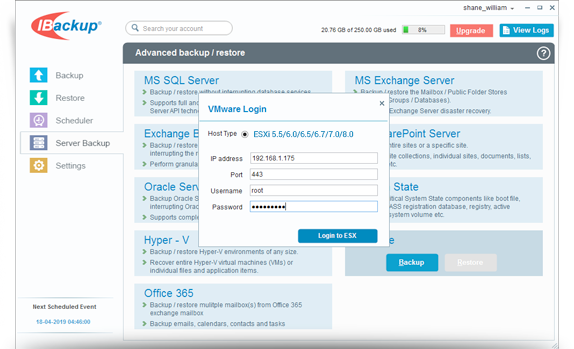
- In the VMware section, click 'Restore'. The VMware login screen appears.
- Enter valid credentials, and click 'Login to ESXi'.
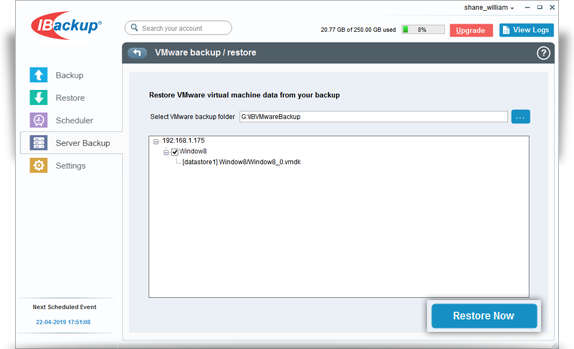
- Browse and choose the 'IBVMwareBackup' folder (restored earlier from your IBackup account).
- Select the virtual machine(s) you want to restore to your VMware server.
- Click 'Restore Now' to restore the virtual machine(s) to the VMware server.
Can I restore VMware virtual machines from a network mapped drive or NAS drive?
Yes, you can restore VMware virtual machines from a local path, including NAS and network mapped drives.
To restore the virtual machine(s) to the VMware server from a network mapped drive or NAS,
- Log in to the IBackup application and click the 'Server Backup' tab.
- In the VMware section, click 'Restore'. The VMware login screen appears.
- Enter valid credentials and click 'Login to ESXi'.
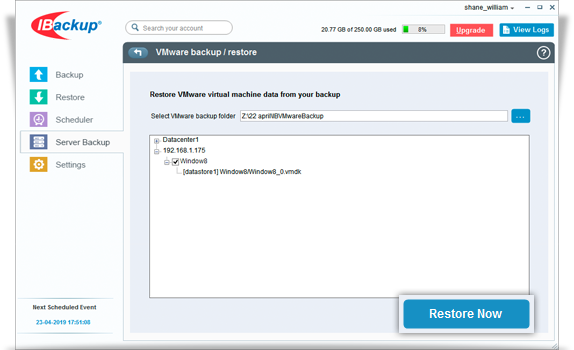
- Browse and select the 'IBVMwareBackup' folder saved in your network mapped / NAS drive.
- Select the virtual machine(s) you want to restore to your VMware server.
- Click 'Restore Now' to restore the virtual machine(s) to the VMware server.
- Click 'Continue' when prompted to power off the virtual machine before continuing with the restore.
- Provide network drive credentials and click 'Authenticate'.
- A restore summary will be displayed on successful completion of the restore.