Granting Mailbox Rights
To perform brick level backup, grant access rights to Exchange 2007/2003/2000 Mailboxes.
Microsoft Exchange 2000, 2003 and 2007 Server accounts with Enterprise Administrators mailbox access rights are denied by default. This restriction is also applicable if your login account is the Administrator account or you are a member of the Domain Admin or Enterprise Admin groups. In these cases also, access to all mailboxes other than your own will be denied, even if you have full administrative rights.
However in Exchange 2000/2003/2007, administrative tasks can be performed without granting an administrator the rights to read anybody's mail.
These default restrictions can be removed with methods that are in agreement with your organization's security and privacy policies. They (the methods) are generally appropriate in a recovery server environment.
Granting rights to a specific mailbox
For Exchange 2007 Mailbox:Method 1:
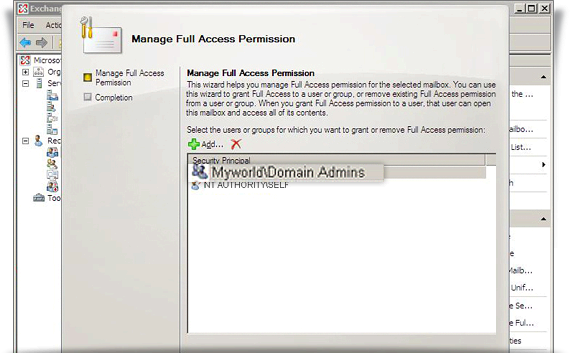
- Open the Exchange Management Console. Choose the Mailbox for which you want to grant permission.Right-click and select the 'Manage Full Access Permission' menu option.

- In the 'Manage Full Access Permission' screen, grant full access to the Domain Admins user and click the 'Manage' button.
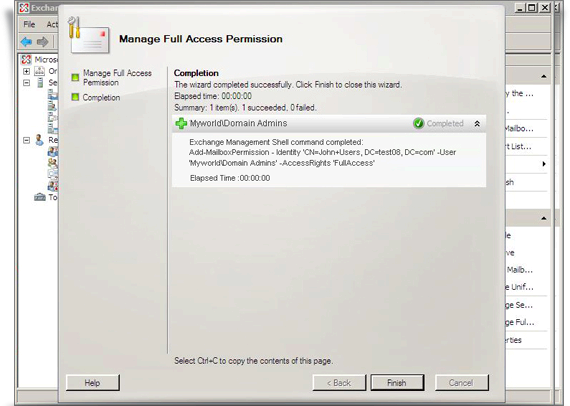
- Click 'Finish' to complete the operation.
Open the Exchange 2007 management shell and enter the following syntax:
Add-MailboxPermission - identity
Example: To grant full access to the Mailbox 'Adams'. Add-MailboxPermission - identity Adams - accessRights fullAccess - User "MyWorld\Domain Admins"
Note: To perform Exchange 2007 Brick-Level Backup, install the standalone version of MAPI from the Microsoft site. Download Standalone version of MAPI
Exchange 2000 or Exchange 2003 Mailbox:
You must have the appropriate Exchange administrative permissions to do so.
- Start 'Active Directory Users and Computers'.
- On the 'View' menu, ensure that the 'Advanced Features' check box is selected.
Note: This is not necessary on Exchange Server 2003 as the 'Exchange Advanced tab' is exposed by default.
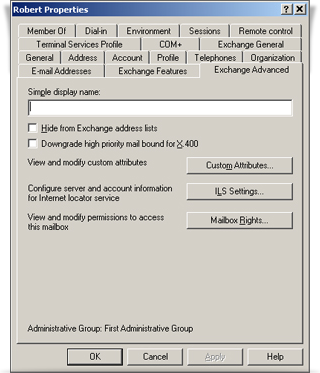
- Right-click on the user for whose mailbox you want to grant permission and choose 'Properties'.

- On the 'Exchange Advanced' tab, click 'Mailbox Rights…'
- Notice that the 'Domain Admin' and 'Enterprise Admin' groups have both been given 'Full Mailbox access'.
- Click 'Add' and then click on the user/group for which you want to grant access to this mailbox and click 'OK'.
- Ensure that the user/group is selected in the 'Name' box.
- In the 'Permissions list', click 'Allow' next to 'Full mailbox access' and click 'OK'.
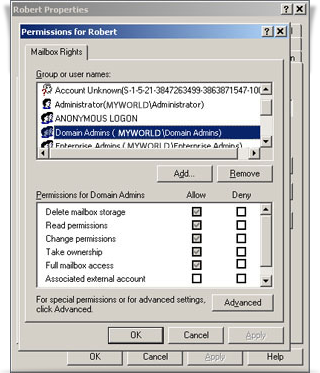
- Click 'OK' to finish.
Granting rights to mailboxes located within a specific mailbox store
You must have the appropriate Exchange administrative permissions to do so.
- Start 'Exchange System Manager'.
- Go to your server object within the appropriate Administrative Group. Expand the server object and locate the required mailbox store within the appropriate 'Storage Group'. Right-click and choose the 'Properties' option.
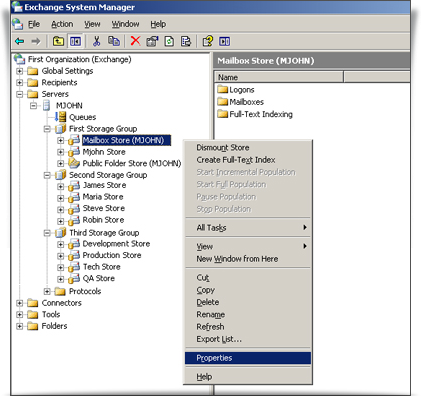
- On the 'Properties' window click the 'Security' tab.
- Click 'Add' and then click on the user/group for whom you want to grant access to the mailboxes and click 'OK'.
- Ensure that the user/group is selected in the 'Name' box.
- On the 'Permissions' list, click 'Allow' next to 'Full Control' and then click 'OK'.
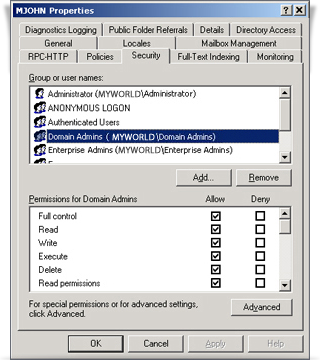
Note: Ensure that no 'Deny' checkbox is selected next to the 'Send As' and 'Receive As permissions'options.
- Click 'OK' to finish.
Granting rights to the mailboxes located on a specific server
You must have the appropriate Exchange administrative permissions to proceed.
- Start Exchange System Manager.
- Go to your server object within the appropriate 'Administrative Group'. Right-click and choose 'Properties'.
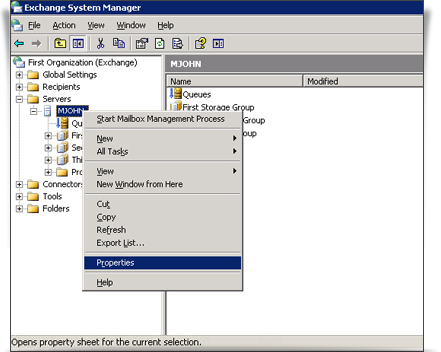
- On the 'Properties' screen go to the 'Security' tab.
- Click 'Add' and then click on the user/group for which you want to grant access to the mailboxes and click 'OK'.
- Ensure that the user/group is selected in the 'Name' box.
- On the 'Permissions' list, click 'Allow' next to 'Full Control' and then click 'OK'.
Note: Ensure that no 'Deny' checkbox is selected next to the 'Send As' and 'Receive As permissions'options.
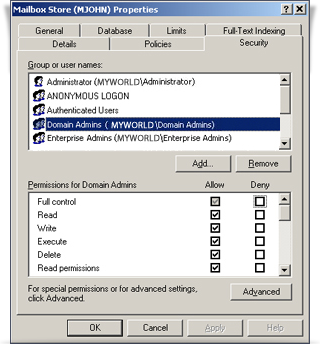
- Click 'OK' to finish.